Transactions
- 28 Feb 2024
- 10 Minutes to read
- Contributors

- Print
- DarkLight
- PDF
Transactions
- Updated on 28 Feb 2024
- 10 Minutes to read
- Contributors
- Print
- DarkLight
- PDF
Article summary
Did you find this summary helpful?
Thank you for your feedback
As actors communicate with each other via accounts, transactions and formulas are used for account interaction. Transactions change actor states and account balances. Transactions can be made both manually and automatically.
In the Transactions section, you can create a manual transaction, view the list of transactions for the selected account-currency pair, apply quick filters, or configure and save more complex filters.
You can also view the details of a specific transaction to view its linked parent or child transactions.
Transactions View Menu
To view information on transactions or make a manual transaction, open the Simulator->Transactions section of your workspace menu.
Alternatively, you can access the transaction history of a selected account-currency pair from the Graphs or Actors bag sections by going to the actor's Details and opening the Accounts tab. You can also view transactions for an account by selecting Show transactions in the Account menu (see the transaction viewing and managing section below).
Depending on the granted rights in the Transactions section, you can view transactions based on the following properties:
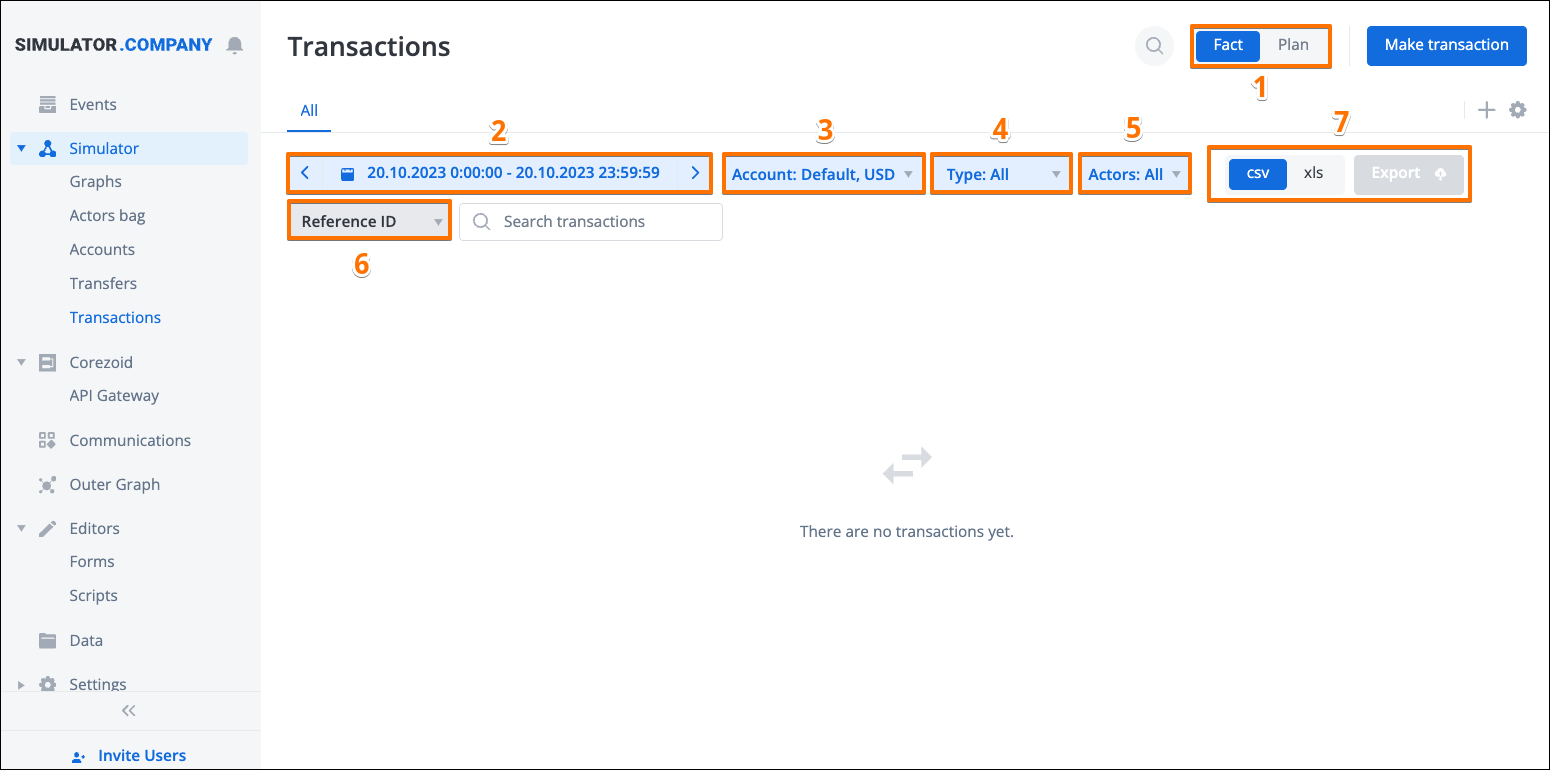
- Actual (Fact) or planned (Plan) accounts used (1).
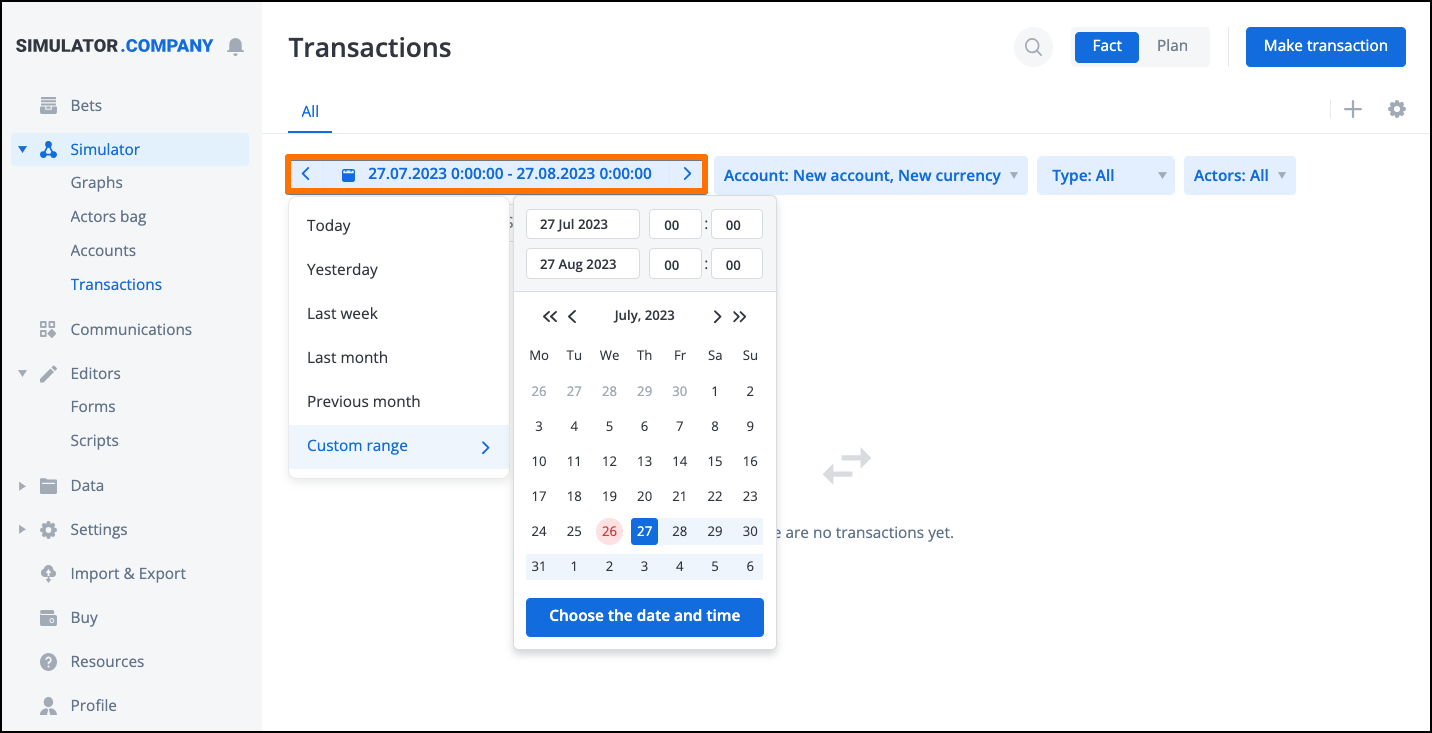
- Date and time in the dd-mm-yyyy hh:mm:ss format, including custom and preset intervals (Today, Yesterday, Last week, Last month, Previous month) (2):
- Account and currency pair (3):
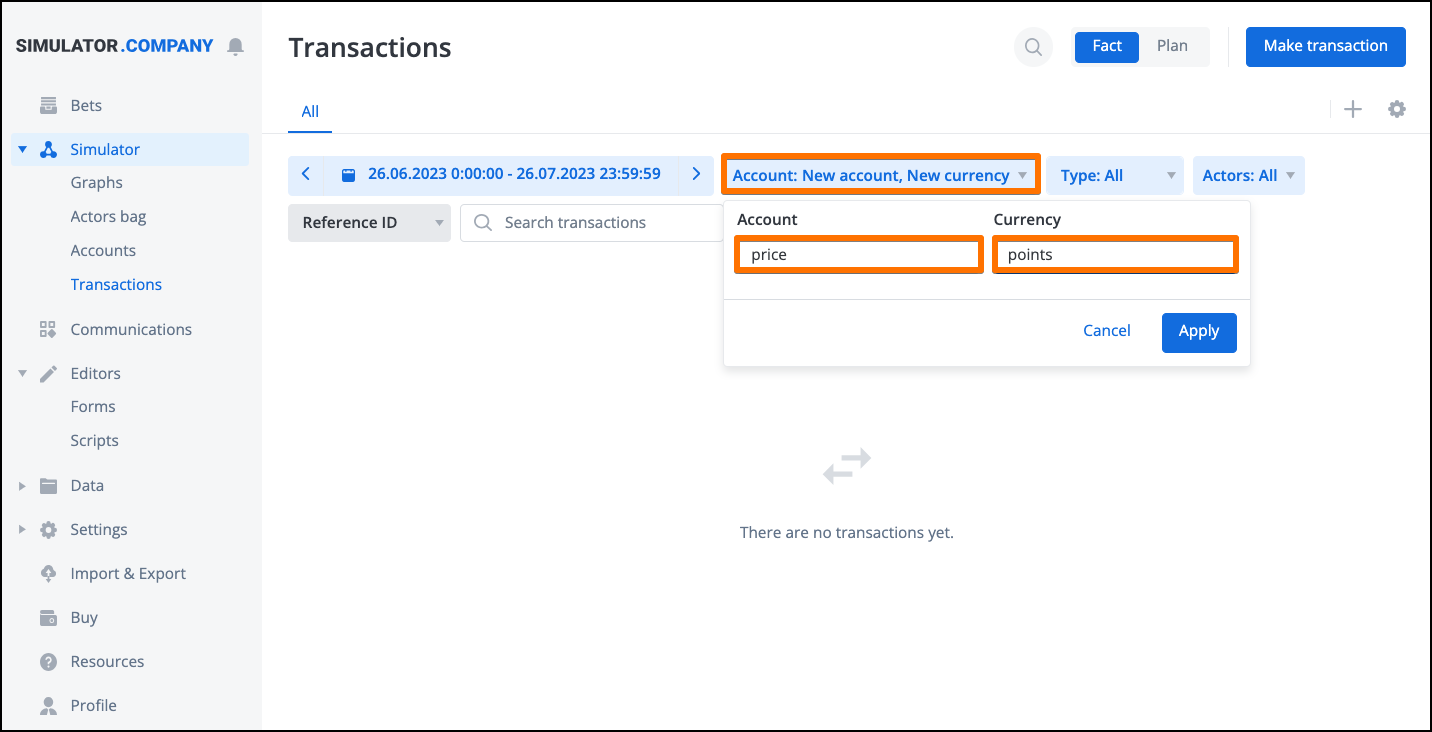
Transactions display after selecting Date and time and Account-Currency
To view transactions in the list, you need to select the date and time and an account with a currency. Other fields are optional
- Type (Debit, Credit, All) (4). With All set as the default option, you can choose to display only debit or credit transactions in this optional field:

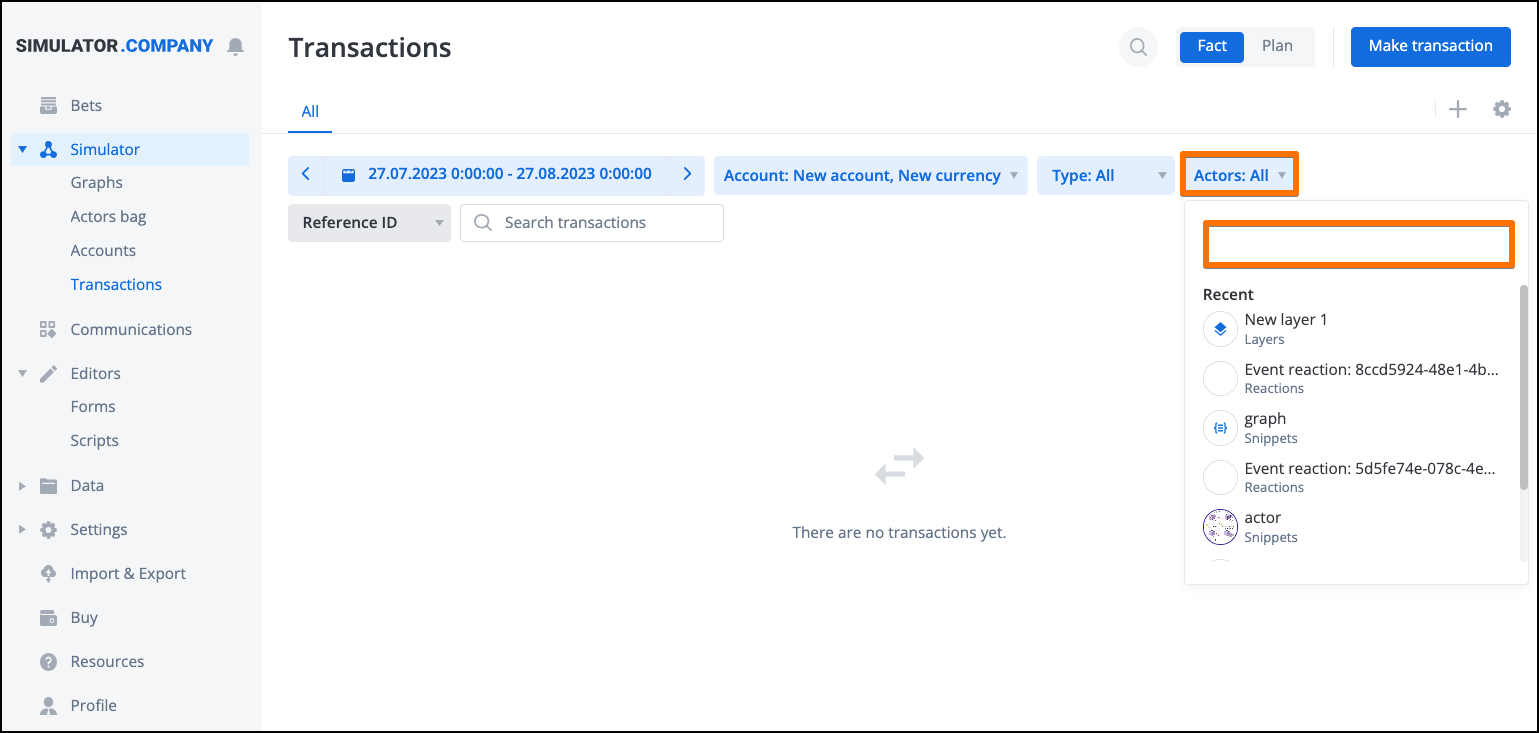
- Transaction actor (5). You can search for a needed actor by typing its name in the field or select an actor in the drop-down list:
After you've selected a transaction type or a transaction actor, the Reset filters button appears in the parameters menu:
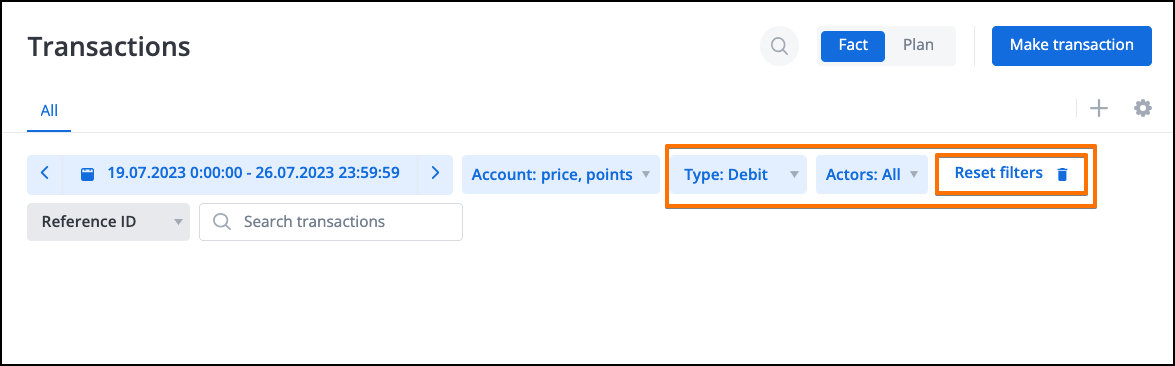
Clicking this button resets the selected Type and Actor values to the default while leaving the other parameter filter settings unchanged.
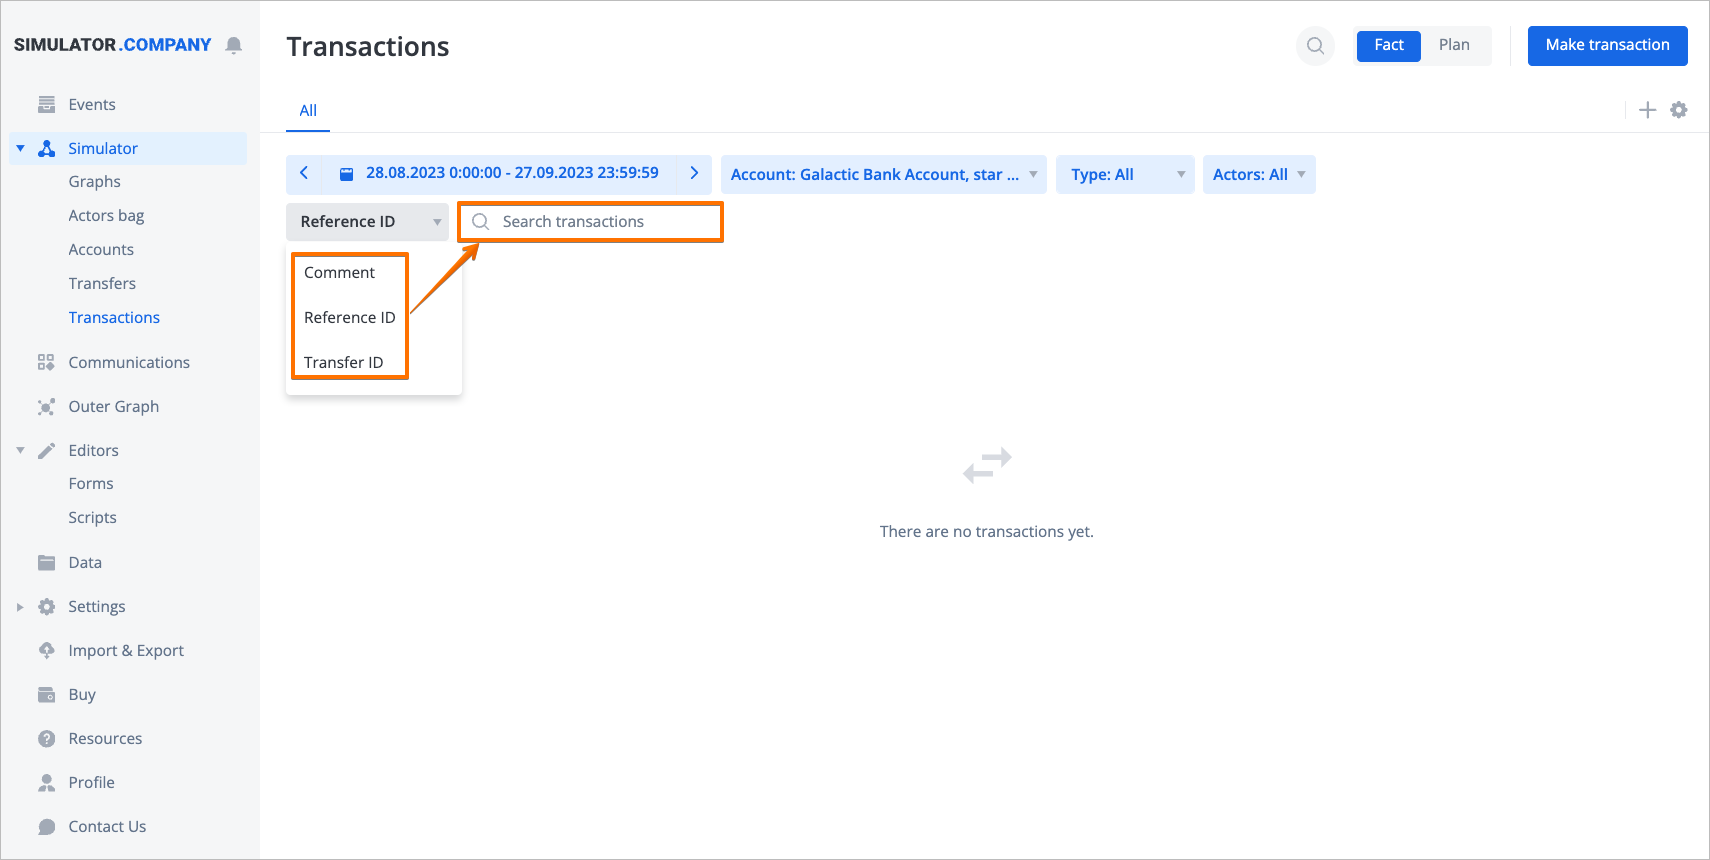
- Reference ID (6). In the drop-down list of this field, you can choose to search for a transaction by entering its reference ID, comment that it contains, or an ID of a transfer, which includes the transaction, in the search field.
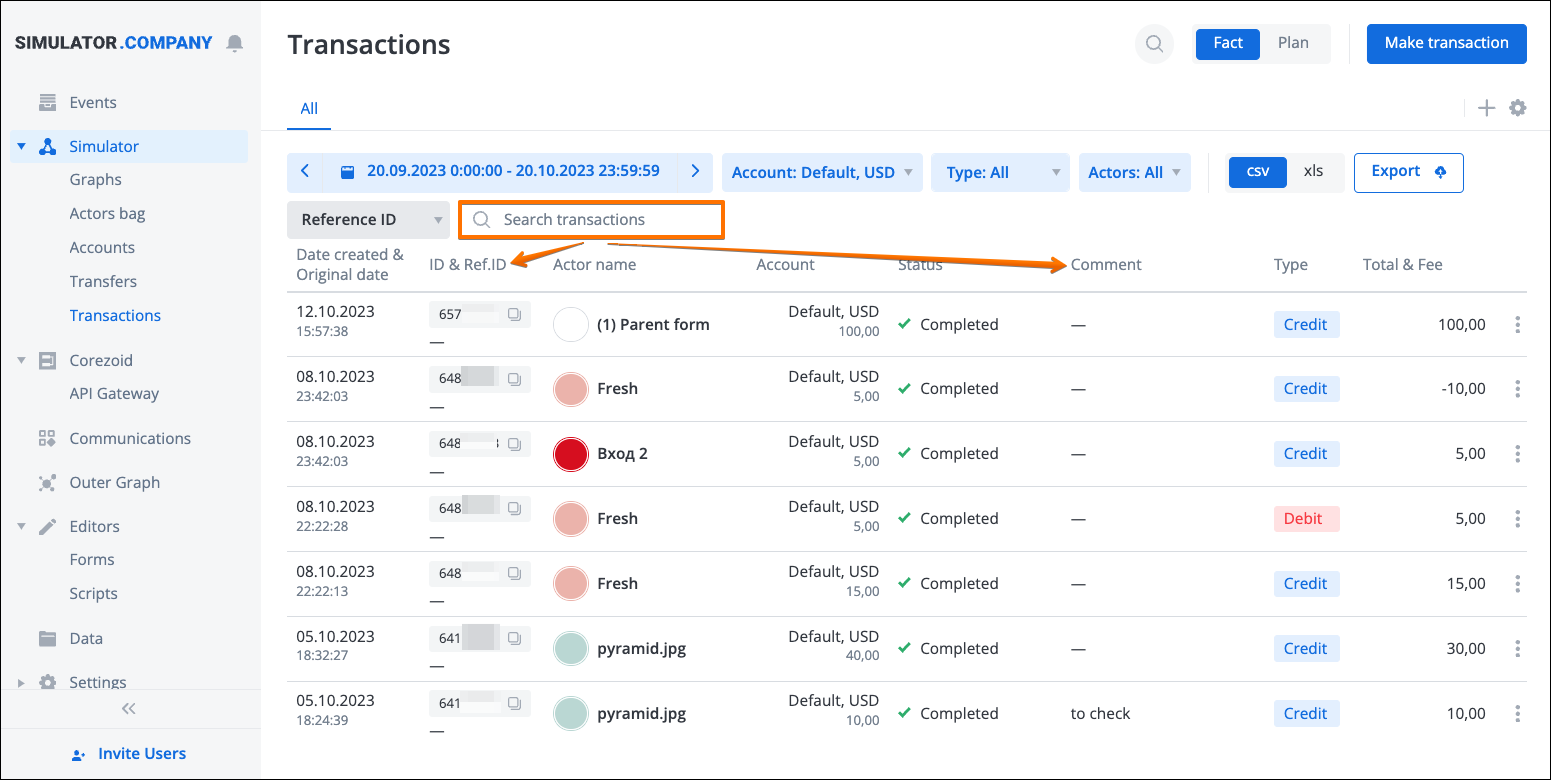
You can find the transaction reference ID and comment text in the corresponding columns of the transactions list, which is displayed after selecting the date and account-currency pair:
If a transaction is part of a transfer, it will have a transfer ID in the panel, which you can copy.
- Export (6). You can export the selected transactions to a csv or xls file by clicking the Export button (is active when the transactions list is populated).
Transaction Details Display in the Menu
After selecting the necessary parameters, transactions are displayed in the list with the following details:
- Date created & Original date - date on which the transaction was created and the original transaction date specified when creating the transaction. By default, they match for all newly created manual transactions. If the original date and creation date/time do not match for a transaction, both are displayed in this column;
- ID & Ref ID - transaction ID and reference ID. You can quickly copy a transaction ID by clicking the copy symbol in this column;
- Actor name - transaction actor name;
- Account - the name of the account against which a transaction was made;
- Status - current transaction status;
- Comment - comment to a transaction (if available);
- Type - transaction type: debit or credit;
- Total & Fee - transaction total amount and fee (if available). Total = Amount - Fee.
Switching to another workspace menu section
Switching to another workspace menu section and then returning to the Transactions menu will retain all the previously configured parameter settings.
Transaction Details Menu
By clicking on a transaction in the list, you can open the transaction details menu. The menu opens in the Details tab by default and provides the following details in addition to those available in the transactions list:
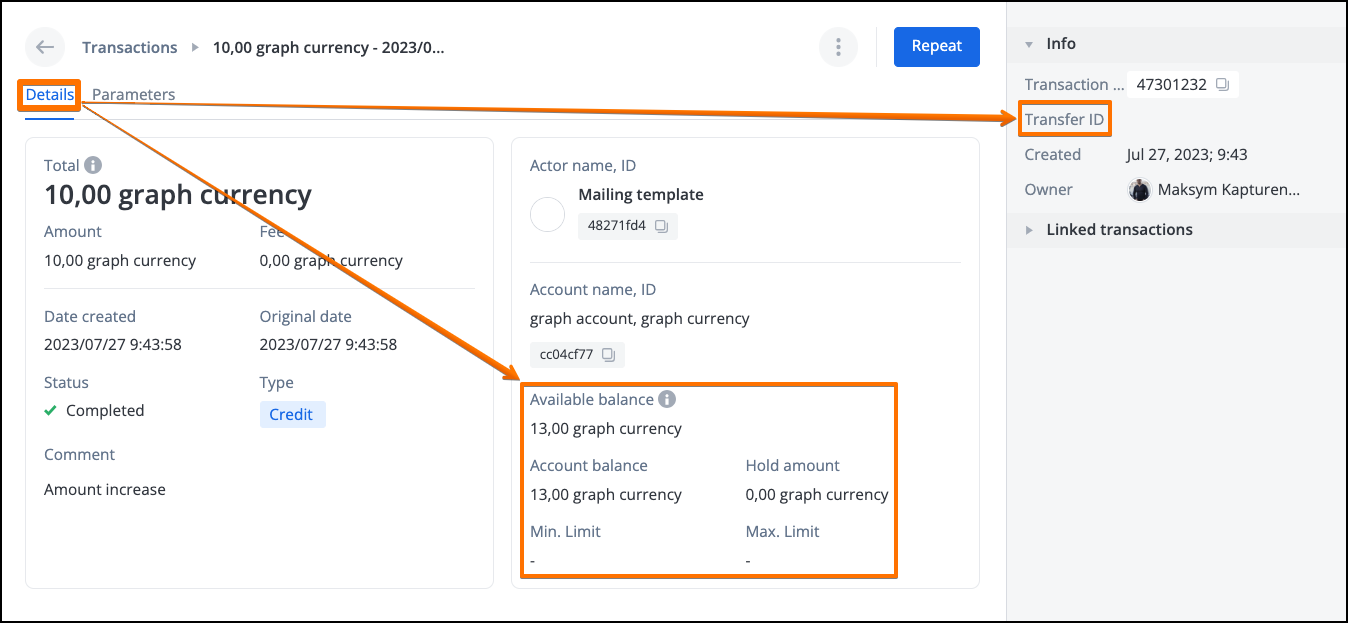
- Transaction account available balance. Available balance = Account balance - Hold amount;
- Transaction account balance;
- Hold amount;
- Transaction account min. limit;
- Transaction account max. limit;
- Transfer ID - if a transaction was a transfer transaction, in the Info panel to the right, you will find its Transfer ID.
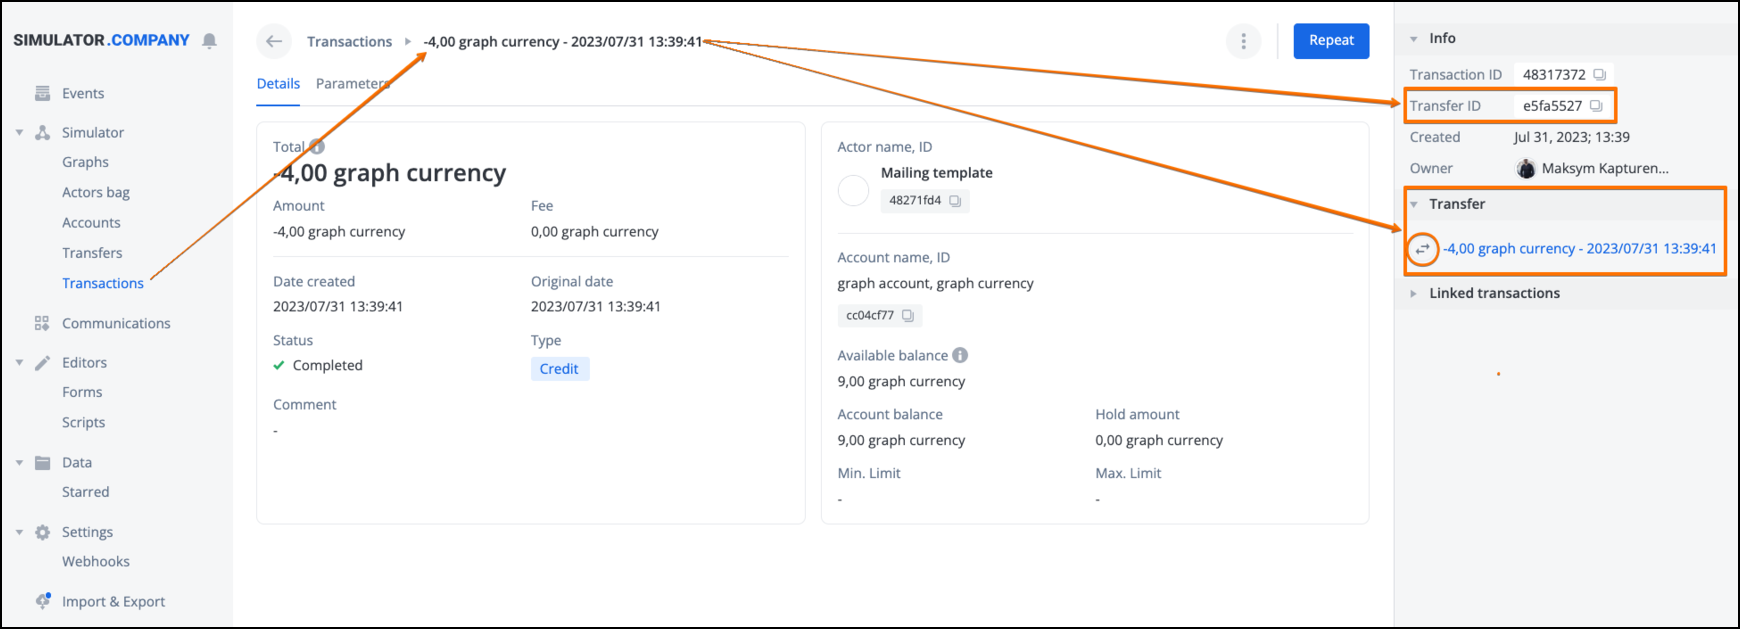
Each transaction belonging to a transfer that you view in the transaction details menu has a Transfer ID, transfer currency name and link (arrows symbol) to the transfer in the right-side Transfer section below the Transfer ID:
In the Parameters tab of the transaction details menu, you can view the parameters that were specified when making the transaction:

Transaction management in the transaction details menu
In the transaction details menu, you can access the menu of operations on a transaction by clicking on the menu icon in the upper right corner of the window:
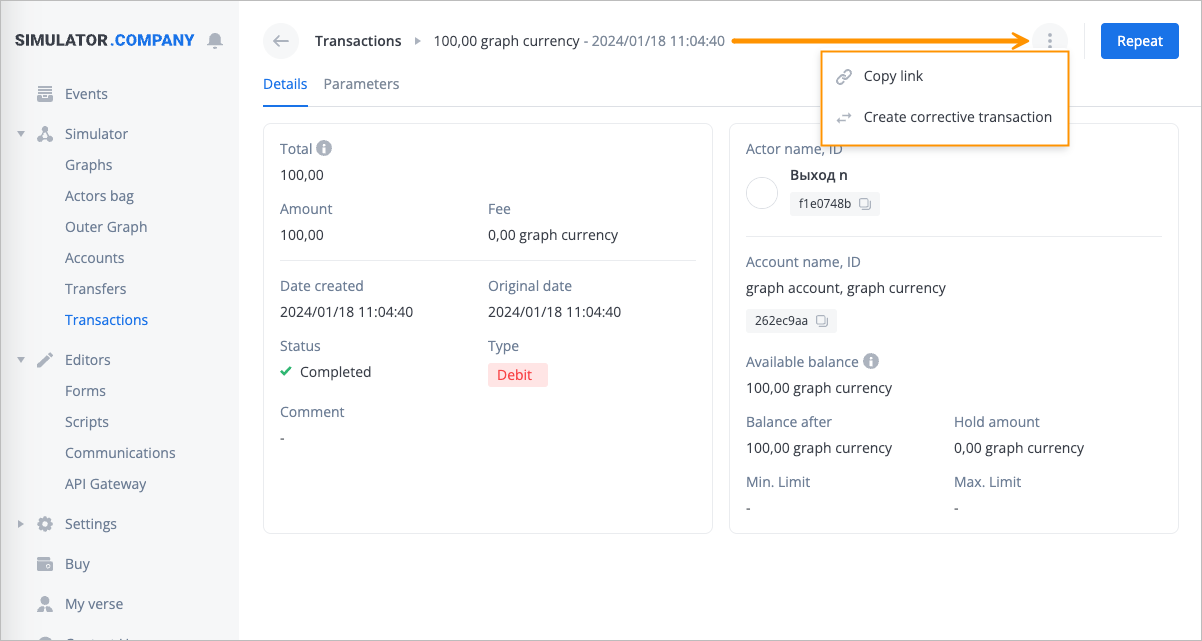
The menu provides the following operations:
- Copy link - copy the transaction link;
- Create corrective transaction - create an adjustment transaction for the selected transaction.
You can also repeat a transaction by clicking the Repeat button in the upper right corner of the transaction detail menu window. When repeating. transaction, all the
Making a Transaction. Numeric Accounts
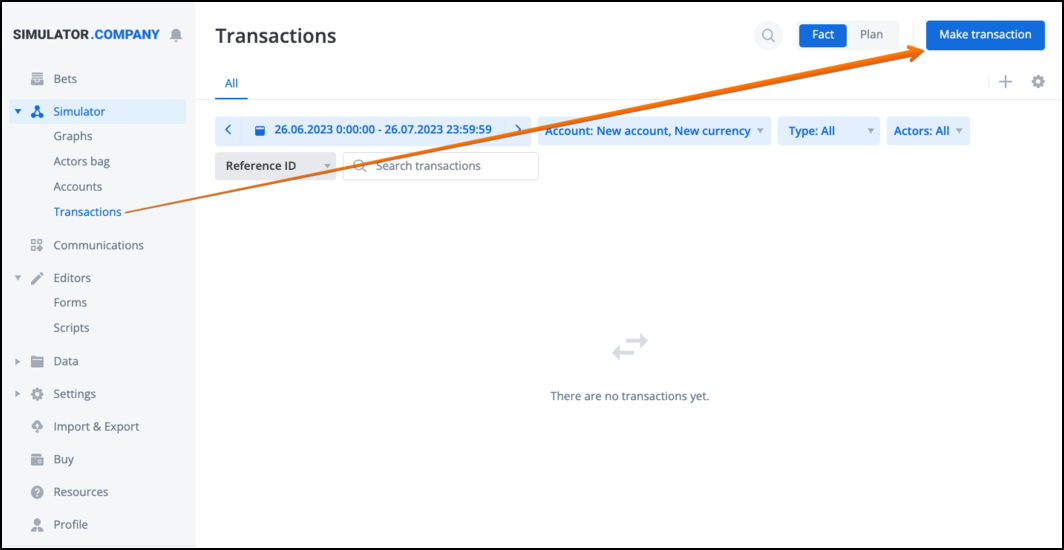
To make a transaction manually, open the Transactions section and click the "Make transaction" button:
In the transaction creation window, configure the following parameters:
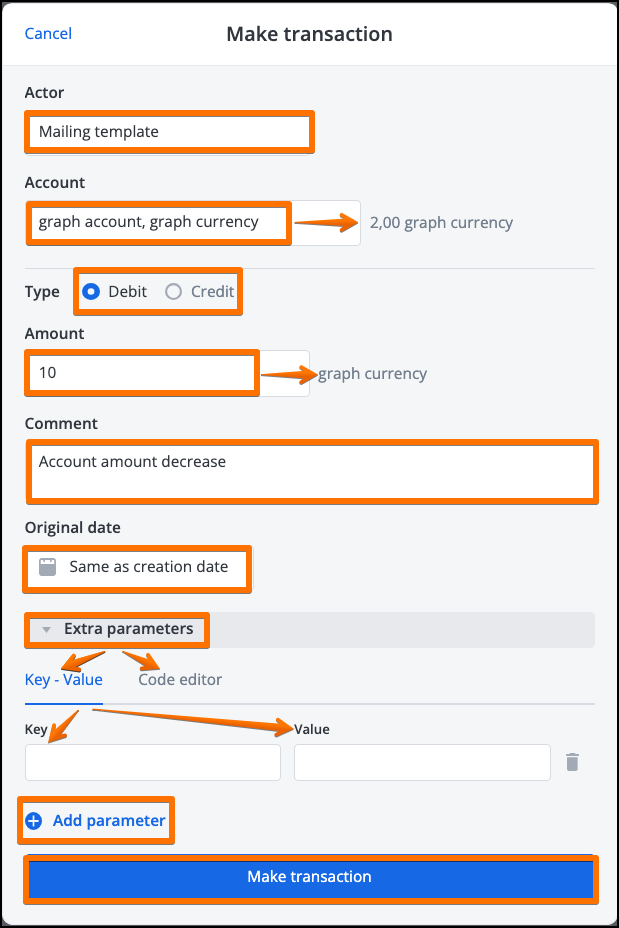
- Actor - the actor for which the transaction will be made. You can specify an actor by starting to type an actor name in the field and then selecting the needed actor from the list or by pasting an actor ID;
- Account - the account of the selected actor against which the transaction will be made. All available accounts of the selected actor are listed when clicking this field. If the selected actor has no accounts, please select another actor with at least one account to proceed. You can view the current balance for the selected account and its currency to the right of the field;
- Type - select a debit or a credit transaction type;
- Amount - specify the transaction amount. The selected account currency is displayed to the right.
After you've specified the transaction amount, you can click the Make transaction button in the transaction creation window to complete the transaction. If you want to configure optional transaction parameters, proceed to the Comment field.
- Comment (optional) - enter any text comment for the transaction;
- Original date (optional) - specify the transaction's original date. By default, the date is set to the current date and time. However, you can specify any prior or future date you need. If the original date and creation date/time do not match for a transaction, both will be displayed in the transactions list;
- Extra parameters (optional) - adds an extra parameter in the Key-Value format to the transaction. It is similar to the Corezoid code editor available in nodes, you can use the following interfaces for adding an extra parameter:
- Key - Value
- Code editor
You can view the added extra parameters in the Transaction details menu.
- Add parameter (optional) - clicking on this field allows adding another extra parameter.
After configuring all the needed transaction parameters click on the Make transaction button to make the transaction.
After you've made a transaction for the specified amount, the Total & Fee values of the accounts involved will change accordingly.
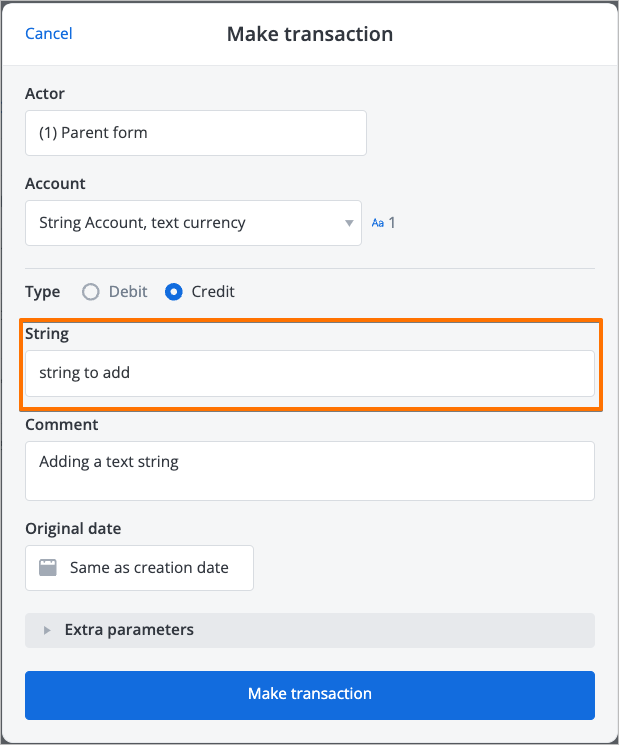
Making a Transaction. String Accounts
For String type accounts, the transaction creation menu is similar, except it has the String field instead of the Amount. In this field, you can specify the string you want to add or subtract from the selected string account:
Depending on the credit or debit type you've selected when making a transaction, the string you've specified for the transaction will be displayed with the corresponding type in the transactions list and in the transaction details menu:

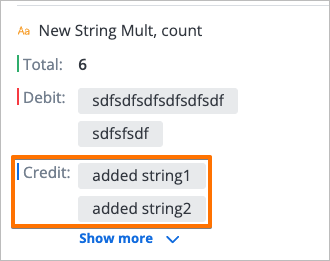
String Account Total & Fee
For a String type account, the Total & Fee value displayed in transactions list and details represents the string (multiple strings) value of the last transaction made against the account, regardless of whether it was a debit or credit transaction.
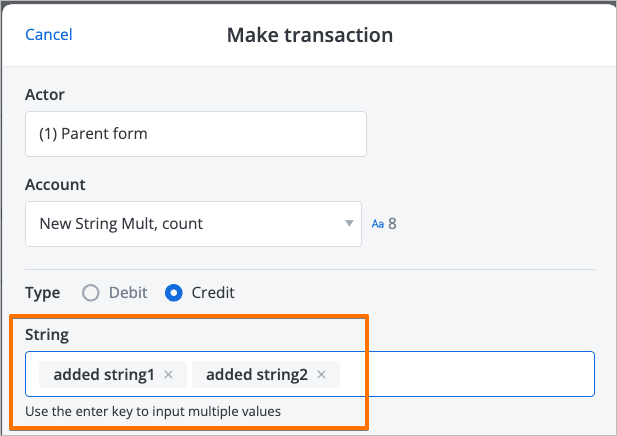
Making a transaction against a string account that contains multiple values allows you to add or subtract multiple strings by specifying them in the String field separated by the Enter key:
The added or subtracted multiple strings will be grouped together when displayed in the transactions list and in the account Total, Debit, Credit drop-down details with the corresponding transaction type indication:
| Transactions list | Account Total, Debit, Credit |
|---|---|
 |  |
Making a Transaction. Actor ID Accounts
For actor ID type accounts, the transaction field is Actor ID, and you can specify (select from the list) an actor you want to add or subtract from the selected account:
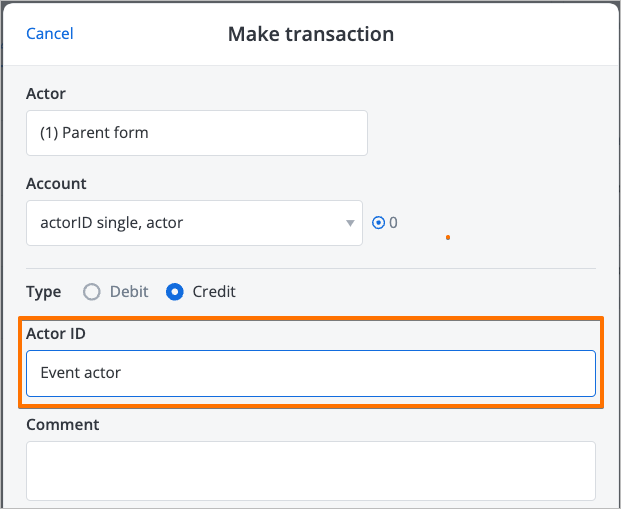
Actor ID Account Total & Fee
For an Actor ID type account, the Total & Fee value displayed in transactions list and details represents the actor (multiple actors) name of the last transaction made against the account, regardless of whether it was a debit or credit transaction.
Similarly, when making a transaction against an actor ID type account that contains multiple values, you can add or subtract multiple actors by specifying them in the Actor ID field, separated by Enter.
In the same manner, single and multiple actors are grouped and displayed with the corresponding transaction type in the transactions list and account details:
| Transactions list | Account Total, Debit, Credit |
|---|---|
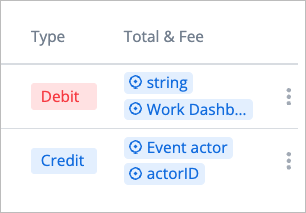 | 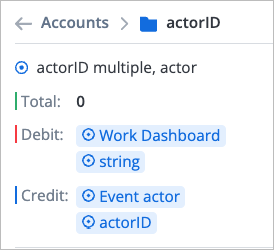 |
Making a Corrective transaction
For each numeric transaction, you can create an adjustment transaction, also known as a Сorrection transaction. A Correction transaction is used to adjust the amount of a selected transaction by the specified amount.
To make a Corrective transaction for a transaction, in the transactions list (in the Transactions section or Accounts->Currency menu->Show transactions in the Accounts section, or Accounts tab->Show transactions in the Graphs, Actors bag sections), click on the menu symbol (three dots) to the left of the transaction you need and select Create corrective transaction from the menu:
The window for creating a corrective transaction will open:
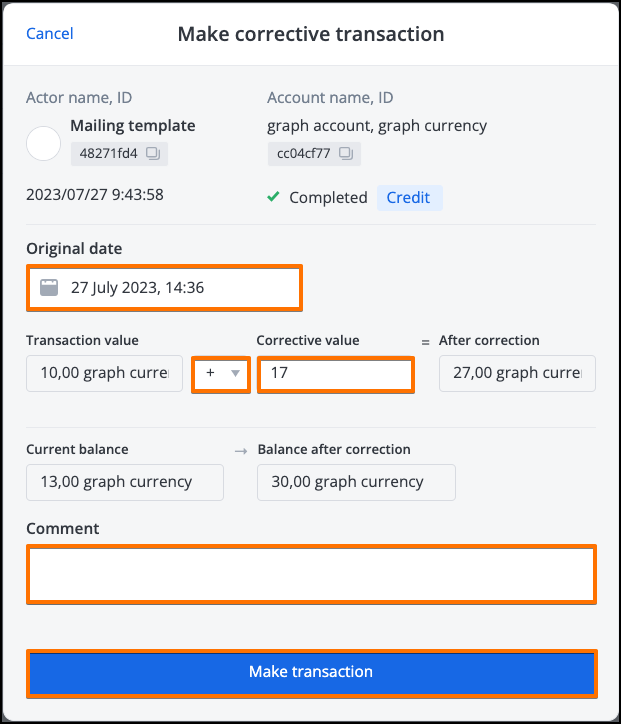
In this window, configure the following parameters for your corrective transaction:
- Original date (optional) - specify the corrective transaction's original date. By default, the original date is set to the current date and time. However, you can specify any prior or future date you need;
- Corrective transaction sign - select whether the corrective transaction amount will be positive (+) or negative (-) to adjust the current account balance, respectively;
- Corrective value - specify the corrective transaction amount;
For your convenience, below you can see the Current balance and Balance after correction values for the account, which show the information in real-time according to the corrective transaction sign and value you specify; - Comment (optional) - enter any text comment for the corrective transaction.
Corrective transactions for String and Actor ID account types
Corrective transactions are not available for String and Actor ID account types.
After you've specified the needed parameters, click Make transaction:
The original transaction amount will be adjusted accordingly, together with the account balance. The new corrective transaction will be available for management and view in the Linked transactions list of the original transaction details menu:

Viewing and managing a Corrective transaction
To view or manage a Corrective transaction from the Transactions section, follow these steps:
- Click on the original transaction in the list for which a Corrective transaction was made. This will open the transaction details menu;
- In the right-side info panel of the transaction details menu, find the Linked transactions section;
- Click on the needed child transaction (the Corrective transaction) in the Linked transactions section:
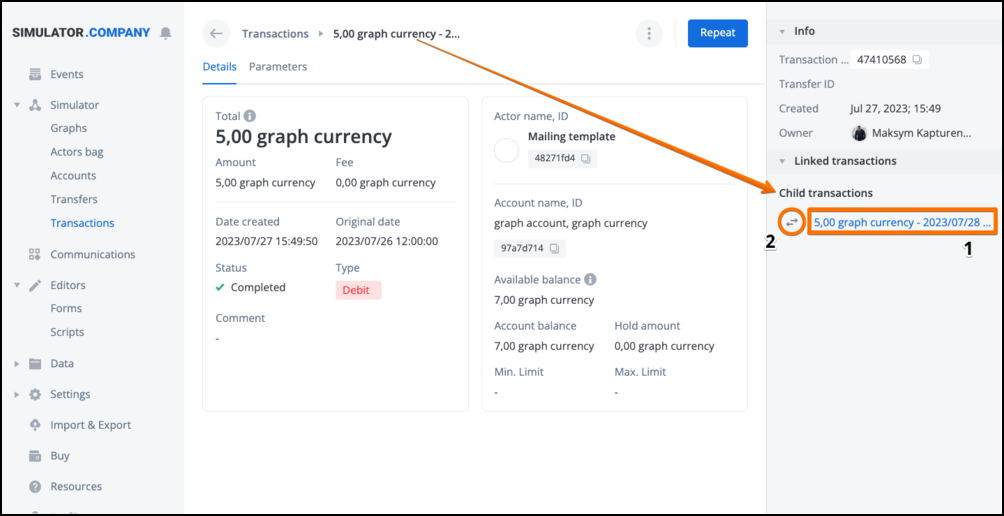
You can click on the child (Corrective) transaction in the Linked transactions list (1) or click on the switch symbol (2) to open the Corrective transaction details menu or go back to the parent transaction.
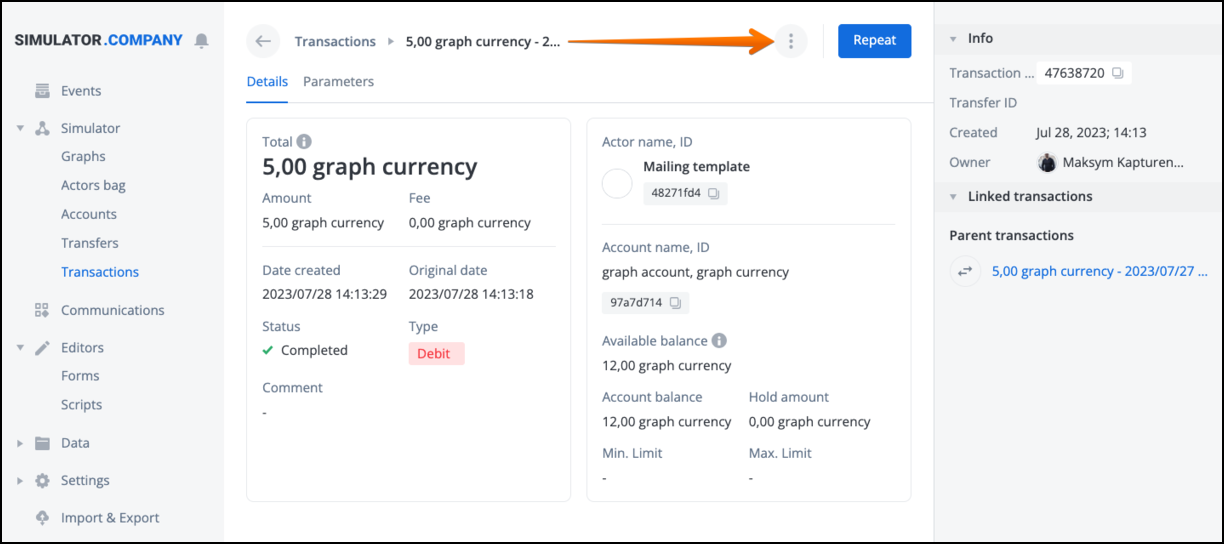
- Now you can view the Corrective transaction details. To manage the Corrective transaction, open the operations menu by clicking on the menu icon:
To view or manage transactions, including Corrective transaction, from the Graphs or Actors bag section, follow these steps:
- Select the needed actor in the list;
- Open the actor Details menu;
- Go to the Accounts tab;
- Select the account against which a Corrective transaction was made;
- Click on Show transactions in the account menu to display the list of transactions;
- Click Transaction details in the transaction menu.
To view or manage transactions, including Corrective transactions, from the Accounts section, follow these steps:
- Select the needed Account in the list;
- Open the account menu and select Show transactions;
- Click on the needed (Corrective) transaction in the list to view its details;
Was this article helpful?