- Print
- DarkLight
- PDF
Overview
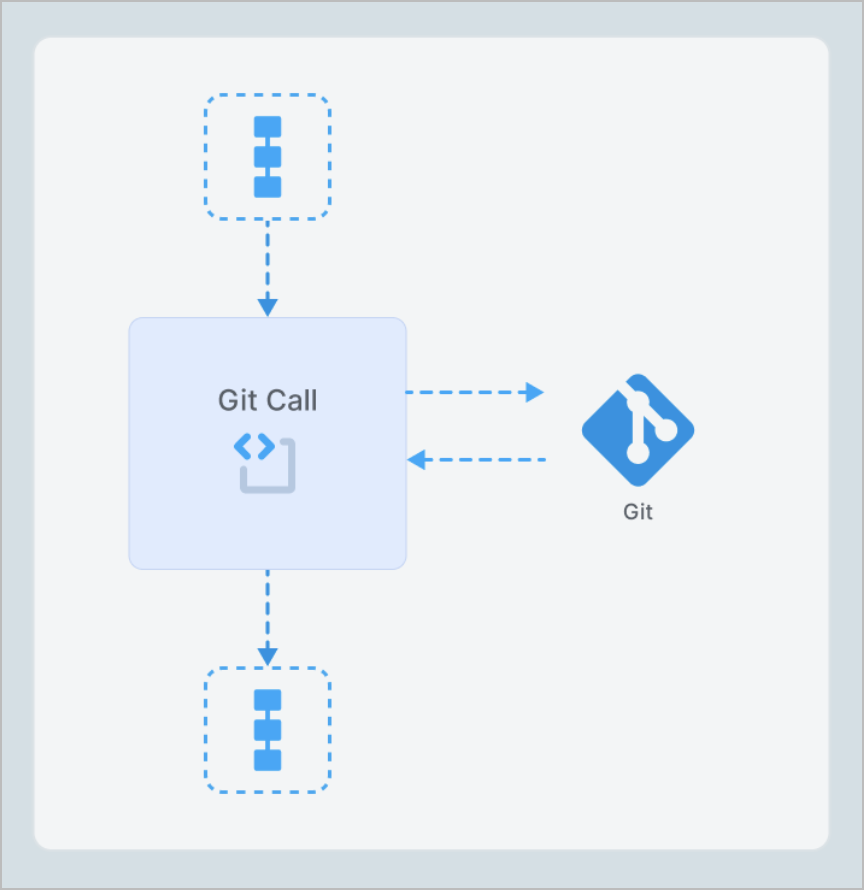
With the Git Call node, you can easily fetch and execute code from any Git repository, be it GitHub or any other platform. All you need to do is specify the needed repository, write a program that uses it (or include it in the repository), and give proper build instructions.
Experience with Git and the command line is recommended before you start working with the Git Call node.
When working with the Git Call node, the following will make using your code much easier:
- If you're not a Git pro, the Git Call node is designed to be user-friendly and easy to work with. So, you can quickly and effectively access and execute code from any Git repository without much hassle.
- The intricacies of the node's internal Processes may appear intimidating to those unfamiliar with Docker containerization, but you don't need to understand them to work with the Git Call node. All you need to know is that it works as a miniature computer that effectively executes your code.

In GitCall, you can run code for the following programming languages:
- JavaScript (NodeJS)
- GoLang
- Python
- Java
- PHP
- Closure
- Lisp
- Prolog
- GitCall allows custom Dockerfiles to provide more flexibility and broader capabilities for configuring code-running environments. This feature makes using code in any language, be it C, C++, Rust, Swift, or any other language possible.
Code dependencies management
In the GitCall, two options for using your code are available:
- Code editor - you enter user code directly in the Git Call node's Code editor.
- Git Repo - you specify the link to a git repository that contains the code.
The code dependencies management differs depending on the option you choose.
JS
For managing dependencies in JS, the following package manager is used:
https://www.npmjs.com/
Сode editor
Build command:
npm install crypto-js@4.1.1 moment@2.29.4
Git Repo
You need to add the file with the following dependencies specified to your project:
package.json
{
"name": "gitcall-example",
"version": "1.0.0",
"description": "gitcall example",
"dependencies": {
"crypto-js": "^4.1.1",
"moment": "^2.29.4"
}
}
Python
For managing dependencies in Python, the following package manager is used:
https://pip.pypa.io/
Сode editor
Build command:
pip install 'pkg_info==0.1.2' 'pycryptodomex==3.20'
Git Repo
You need to add the file with the following dependencies specified to your project:
requirements.txt
pycryptodomex==3.20
Java
To manage dependencies and building in Java, you can use any available build options by specifying any command in the Build command field.
The main tools for Java project building:
https://gradle.org/
https://maven.apache.org/
Сode editor
The dependencies command is not available.
Git Repo
You need to add gradle files (use the structure from the example below) to your project and specify the needed dependencies in the build.gradle.
The example with dependencies specified (implementation: 'com.squareup.okhttp3:okhttp:4.9.0'): https://github.com/corezoid/gitcall-examples/blob/master/java/http_request/usercode/build.gradle#L9
If the system detects a gradlew file in your project, gitcall will automatically execute the Build command:
./gradlew build
Also, you can specify any command you wish to use in the Build command field.
Golang
For managing dependencies in Golang, the following package manager is used:
https://go.dev/ref/mod
Сode editor
In Golang, the last versions of dependencies are set automatically.
Git Repo
In Golang, the last versions of dependencies are set automatically.
If you need to specify specific dependency versions, add the following file to your project:
go.mod
module uuid_deps

go 1.22.5

require (
  github.com/corezoid/gitcall-go-runner v1.0.0
  github.com/google/uuid v1.6.0
)
PHP
In PHP, you can install packets and extensions.
For dependencies management in PHP, use the following:
https://getcomposer.org/
For extensions management in PHP, use the following:
https://github.com/mlocati/docker-php-extension-installer
Сode editor
Build command:
composer require pdeans/xml-builder:^1.0.3 guzzlehttp/guzzle:^7.0
or:
docker-php-ext-install pcntl soap bcmath pdo_mysql
or the combined Build command:
docker-php-ext-install bcmath && composer require guzzlehttp/guzzle:^7.0
Git Repo
You need to add the file with the following dependencies specified to your project:
composer.json
{
"name": "gitcall/example",
"type": "project",
"require": {
"guzzlehttp/guzzle": "^7.2"
}
}
List of supported PHP extensions
Clojure
For managing dependencies in Clojure, use the following manager:
https://leiningen.org/
Сode editor
Build command:
lein change :dependencies conj '[danlentz/clj-uuid "0.1.9"]' && lein install
For multiple dependencies:
Build command:
lein change :dependencies conj '[danlentz/clj-uuid "0.1.9"]' '[org.clojure/data.json "2.5.0"]' && lein install
Git Repo
You need to use the structure from the example below and add the file with specified dependencies to your project:
project.clj
(defproject usercode "1.0.0"
:description "gitcall-example"
:dependencies [[danlentz/clj-uuid "0.1.9"]])
Lisp
For managing dependencies in Lisp, use the following managers:
https://roswell.github.io/
https://www.quicklisp.org/
Сode editor
You don't need to use the Build command to upload dependencies to Lisp. It's sufficient to specify the needed dependency in your code:
(ql:quickload '(:cl-mustache) :silent t)
Git Repo
In Git repositories there are two ways of dependencies management:
- Similar to the dependencies management in Code editor for Lisp, you need to specify the needed dependency in your code:
(ql:quickload '(:cl-mustache) :silent t)
Prolog
For managing dependencies in Prolog, use the following package manager:
https://www.swi-prolog.org/pack/list
Сode editor
Build command:
swipl -g "pack_install(matrix, [interactive(false)])."
Git Repo
Build command:
swipl -g "pack_install(matrix, [interactive(false)])."
Custom Dockerfiles Use
Git Call supports the use of custom Dockerfiles, providing more flexible options for configuring the code execution environment. This feature allows users to create their own Docker containers with necessary dependencies and configurations.
Key aspects
- Creating a Dockerfile
- Users can create their own Dockerfile for their project.
- The Dockerfile can be placed in the repository along with the project code.
- Git Call will use this Dockerfile to create the execution environment.
- Mandatory requirements
- In the Dockerfile, it's necessary to create a user and group with ID 501:
RUN addgroup -g 501 usercode && adduser -u 501 -G usercode -s /bin/sh -D usercode
USER usercode
- The container will be run in read-only mode.
- The /tmp directory is available for temporary files.
- HTTP server
- The Dockerfile needs to set up an HTTP server that will listen on the port specified in the GIT_CALL_PORT environment variable.
- The server should handle POST requests and work with the JSON-RPC 2.0 protocol.
- Example Dockerfile structure
FROM node:20-alpine
WORKDIR /app
COPY src/ .
RUN addgroup -g 501 usercode && adduser -u 501 -G usercode -s /bin/sh -D usercode
USER usercode
CMD ["node", "main.js"]
- Advantages of using Dockerfile
- Ability to install additional dependencies and libraries.
- Flexible environment configuration for specific project needs.
- Possibility to use languages and tools not supported by the standard Git Call configuration (e.g., C++, Rust).
- Working with Dockerfile
- When selecting the Dockerfile option in Git Call settings, the user specifies the repository URL and path to the Dockerfile.
- Git Call clones the repository, builds a Docker image based on the provided Dockerfile.
- The built image is used to execute the user's code.
- Usage recommendations
- Dockerfile is suitable for more complex projects with non-standard requirements.
- For simple tasks, it's recommended to use the standard Git Call code editor.
- When using Dockerfile, the user takes responsibility for correctly configuring the execution environment.
Settings
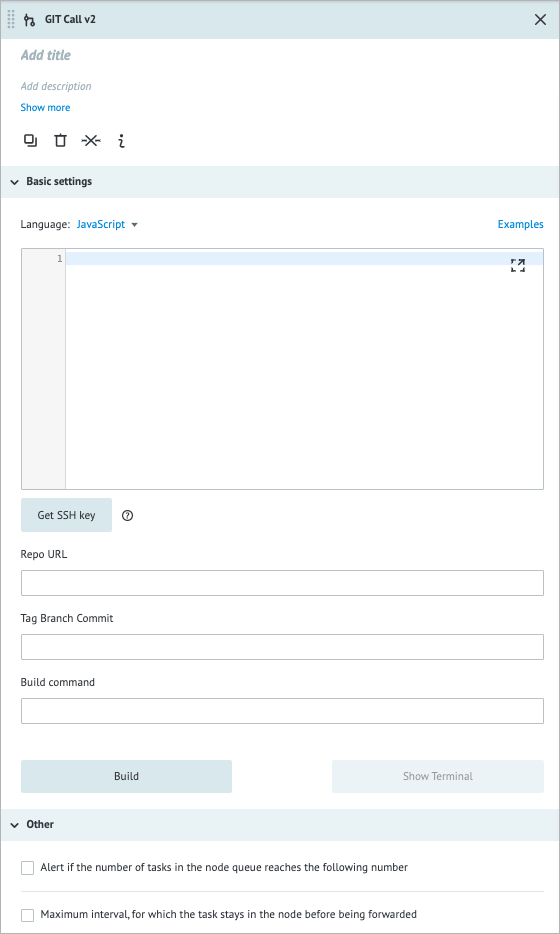
The Git Call node has the following parameters:
(Optional) Title and Description: Name and details of the node.
Basic settings:
Language: The following programming languages are supported with their Package Managers (PM) and OS:
- JavaScript (node) v20; PM: yarn, npm; OS: alpine v3.17
- GoLang v1.23; PM: go mod; OS: alpine v3.20
- Python v.3.12; PM: pip; OS: alpine v3.17
- PHP v8.3; PM: composer v2.5.4; OS: alpine v3.17
- Java v22; PM: gradle; OS: alpine v3.15
- Closure v1.11.1; PM: lein 2.10.0; OS: alpine v3.17
- Lisp v2.4.8; PM: roswell v20.05.14.106; OS: Ubuntu v18.04.4
- Prolog; PM: swipl v9.2.7; OS: debian:bullseye-slim
Code editor: You can easily incorporate your custom code with the existing codebase from the Git repository and execute it seamlessly as a part of the overall workflow, meaning:
- js: usercode.js
- go: usercode.go
- python: usercode.py
- php: usercode.php
As another option, you can include the Usercode file in your Git repository, which allows you to manage and control versions of your custom code alongside the main codebase. If the file Usercode is already included in the Git repository, but you also write code in the Code editor, the original file will be overwritten.
To correctly integrate and execute your custom code within the Git Call node, it must be written within a wrapper. You can find detailed examples of the appropriate wrapper syntax for each programming language on our GitHub page.
JSON-RPC 2.0 Protocol: Git Call uses the JSON-RPC 2.0 protocol for communication between the Corezoid platform and the user's code. Understanding this protocol is crucial for effective development and testing of Git Call nodes.
Get SSH key: Generates an SSH key that can be added to your private Git repository and automatically authenticates the node.
Repo URL: Indicates the URL of the Git repository that you will retrieve. If you choose to authenticate your request to access the repository with a username and password, you can do so by adding them to the URL in the following format:
https://username:password@github.com/account/repositoryFor security reasons, it is not recommended to include credentials in the URL. Instead, we suggest using an SSH key to authenticate your requests.
Tag Branch Commit: Indicates a specific branch from your repository; in most cases, it should be Main.
Handler (Java): The name of the class that implements UsercodeHandler.
(Optional) Build command: Commands to build your code and install any missing libraries by using Package Manager. It uses sh (Bourne Shell) and provides a non-interactive environment. After clicking Build, a terminal window opens, and you can monitor the execution of your commands.
(Optional) Resource management: Git Call provides a containerized environment for code execution with allocated resources. Understanding how these resources are managed and can be adjusted is crucial for optimizing performance and handling more demanding tasks.
a. Default Resource Allocation
By default, each Git Call container is allocated:- 100 millicpu (0.1 CPU core)
- 50 MB of RAM
b. Resource Limitations
These default allocations may be insufficient for computationally intensive tasks or operations requiring more memory. Examples of resource-intensive tasks include complex calculations, cryptographic operations, or processing large datasets.c. Current Resource Management
- At present, resource allocation is managed globally for all Git Call nodes.
- Administrators can adjust the global settings to increase resources, e.g., to 500 millicpu or 500 MB of RAM.
- However, this global approach affects all nodes, even those that don't require additional resources.
d. Requesting Additional Resources
If your code requires more resources than the default allocation, you should contact support or your environment's super admin. Explain your use case and the specific resource requirements of your task.e. Dockerfiles and Resources
- When using custom Dockerfiles, be aware that the same resource limitations apply.
- Your Dockerfile should be optimized to work within these constraints or be prepared to request additional resources.
Other:
- Alert if the number of tasks in the node queue reaches the following number: Helps monitor whether the number of tasks in the node exceeds the specified threshold. When selecting the checkbox, you have to enter the needed number of tasks in the field that appears below.
- Maximum interval, for which the task stays in the node before being forwarded: The amount of time a task is allowed to be in the node; can be set in seconds, minutes, hours, and days.
Note: The checkbox has a minimum value of 30 seconds. You can set a shorter interval by using the Unixtime function.

The Git Call node is different from other nodes in that every time you make a change, you’ll need to rebuild the node by clicking Build before deploying it.
JSON-RPC 2.0 protocol use
1. Protocol overview
- JSON-RPC 2.0 is a stateless, light-weight remote procedure call (RPC) protocol.
- It uses JSON as its data format.
- Git Call uses this protocol for both incoming requests to user code and outgoing responses.
2. Request structure
Every JSON-RPC request must contain the following fields:
- jsonrpc: Must be exactly "2.0"
- method: A string containing the method name (typically "handle" for Git Call)
- params: An object containing the parameters for the method
- id: An identifier established by the client.
Request example:
{
  "jsonrpc": "2.0",
  "method": "handle",
  "id": "1234567890",
  "params": {
    "key1": "value1",
    "key2": "value2"
  }
}
3. Response structure
3.1. Successful response must contain:
- jsonrpc: Must be exactly "2.0"
- result: The data returned by the method
- id: The same ID as the request it's responding to.
Successful response example:
{
  "jsonrpc": "2.0",
  "id": "1234567890",
  "result": {
      "key1": "modified_value1",
      "key2": "modified_value2"
    }
  }
3.2. Error response must contain:
- jsonrpc: Must be exactly "2.0"
- error: An object describing the error
- id: The same ID as the request it's responding to.
Example error response:
{
  "jsonrpc": "2.0",
  "id": "1234567890",
  "error": {
    "code": -32000,
    "message": "An error occurred during processing"
  }
}
4. Handling requests in User Code
- The
handlefunction (or equivalent in other languages) should process this data and return a result.
5. Returning responses
- User code should return a JSON object that will be used as the
resultin the JSON-RPC response. - In case of an error, user code should throw an exception or return an error object, which Git Call will format into a proper JSON-RPC error response.
6. HTTP server configuration
- When using a custom Dockerfile, the user must set up an HTTP server that listens on the port specified by the
GIT_CALL_PORTenvironment variable. - This server should accept POST requests and handle them according to the JSON-RPC 2.0 protocol.
7. Example implementation (Node.js)
See the Node.js and Dockerfile examples for other languages on GitHub for details.
const http = require('node:http');

const port = process.env.GITCALL_PORT;
if (!port) {
    console.error('GITCALL_PORT env is required but not set');
    process.exit(1);
}

process.on('SIGTERM', () => process.exit(1));
process.on('SIGINT', () => process.exit(1));
process.on('uncaughtException', function (err) {
    console.error(`[uncaughtException] time=${(new Date()).getTime()} error=${err}`);
});
process.on('unhandledRejection', function (reason, p) {
    console.error(`[unhandledRejection] time=${(new Date()).getTime()} reason=${reason} promise=`, p);
});

const server = http.createServer((request, response) => {
    if (request.method === 'POST' && request.url === '/') {
        let body = [];
        request
            .on('data', chunk => body.push(chunk))
            .on('end', () => {
                response.statusCode = 200;
                handler(Buffer.concat(body).toString(), response);
            });
    } else {
        response.statusCode = 404;
        response.end();
    }
});

const handler = async (body, response) => {
    const req = JSON.parse(body);
    const jsonrpc = req.jsonrpc;
    const id = req.id;
    const params = req.params;
    console.log(`[req] time=${(new Date()).getTime()} id=${id}`);
    try {
        if (typeof params !== 'object') {
            throw Error('expected request params is object');
        }
        let result = usercode(params);
        if (result instanceof Promise) {
            result = await result;
        }
        response.end(JSON.stringify({
            jsonrpc: jsonrpc,
            id: id,
            result: result,
        }));
        console.log(`[res] time=${(new Date()).getTime()} id=${id}`);
    } catch (e) {
        response.end(JSON.stringify({
            jsonrpc: jsonrpc,
            id: id,
            error: {
                code: 1,
                message: e.toString(),
            },
        }));
        console.log(`[res] time=${(new Date()).getTime()} id=${id} error=${e.toString()}`);
    }

};

const usercode = (data) => {
    data["js"] = "Hello, world!"
    return data
};

console.log('listening on 0.0.0.0:' + port);
server.listen(port);
8. Testing JSON-RPC communication
Local testing
Git Call provides the ability to test your code locally before deploying it to the Corezoid platform. This feature allows developers to simulate the Git Call environment on their local machines, ensuring code functionality and performance before integration.
- When testing locally or in CI/CD pipelines, ensure that your test requests follow the JSON-RPC 2.0 format.
- Verify that your code correctly handles the incoming request structure and returns properly formatted responses.
Key aspects
1. Local environment setup
- Users can create a local environment that mimics the Git Call execution environment using Docker.
- This setup allows testing without direct dependency on the Corezoid platform.
2. Docker image creation
- Users build a Docker image locally based on their Dockerfile or the standard Git Call environment.
- This image contains the necessary runtime, dependencies, and the user's code.
3. Running the local container
- The Docker container is run locally, simulating the Git Call node environment.
- Environment variables, such as
GIT_CALL_PORT, are set to mimic the actual Git Call setup.
4. Testing process
Users can send test requests to their locally running container using tools like curl or Postman.
This process emulates how Corezoid would interact with the Git Call node.
5. Example commands for local testing
a) Building the Docker image:
docker build -t gitcall-example
b) Running the Docker container:
docker run --rm -it -p 9999:9999 -e GITCALL_PORT=9999 --user 501:501 --read-only gitcall-example
c) Sending a test request:
curl http://127.0.0.1:9999 -H 'Content-Type: application/json' -d '{"jsonrpc":"2.0","id":"task-id-1","method":"Usercode.Run","params":{"key1":"val1"}}'
6. Benefits of local testing
- Faster development cycle by reducing dependency on the Corezoid platform for testing.
- Ability to debug and troubleshoot code in a controlled local environment.
- Easier integration of Git Call nodes into CI/CD pipelines.
7. JSON-RPC 2.0 protocol in local testing
- Local testing should adhere to the JSON-RPC 2.0 protocol used by Git Call.
- Requests should include the required fields: jsonrpc, method, params, and id.
- Responses should follow the protocol structure, including result or error objects.
8. Example JSON-RPC 2.0 request and response
Request:
{
  "jsonrpc": "2.0",
  "id": 1,
  "method": "handle",
  "params": {
      "key1": "value1",
      "key2": "value2"
    }
}
Response:
{
  "jsonrpc": "2.0",
  "id": 1,
  "result": {
      "key1": "modified_value1",
      "key2": "modified_value2"
    }
  }
Examples
Accessing the Python library
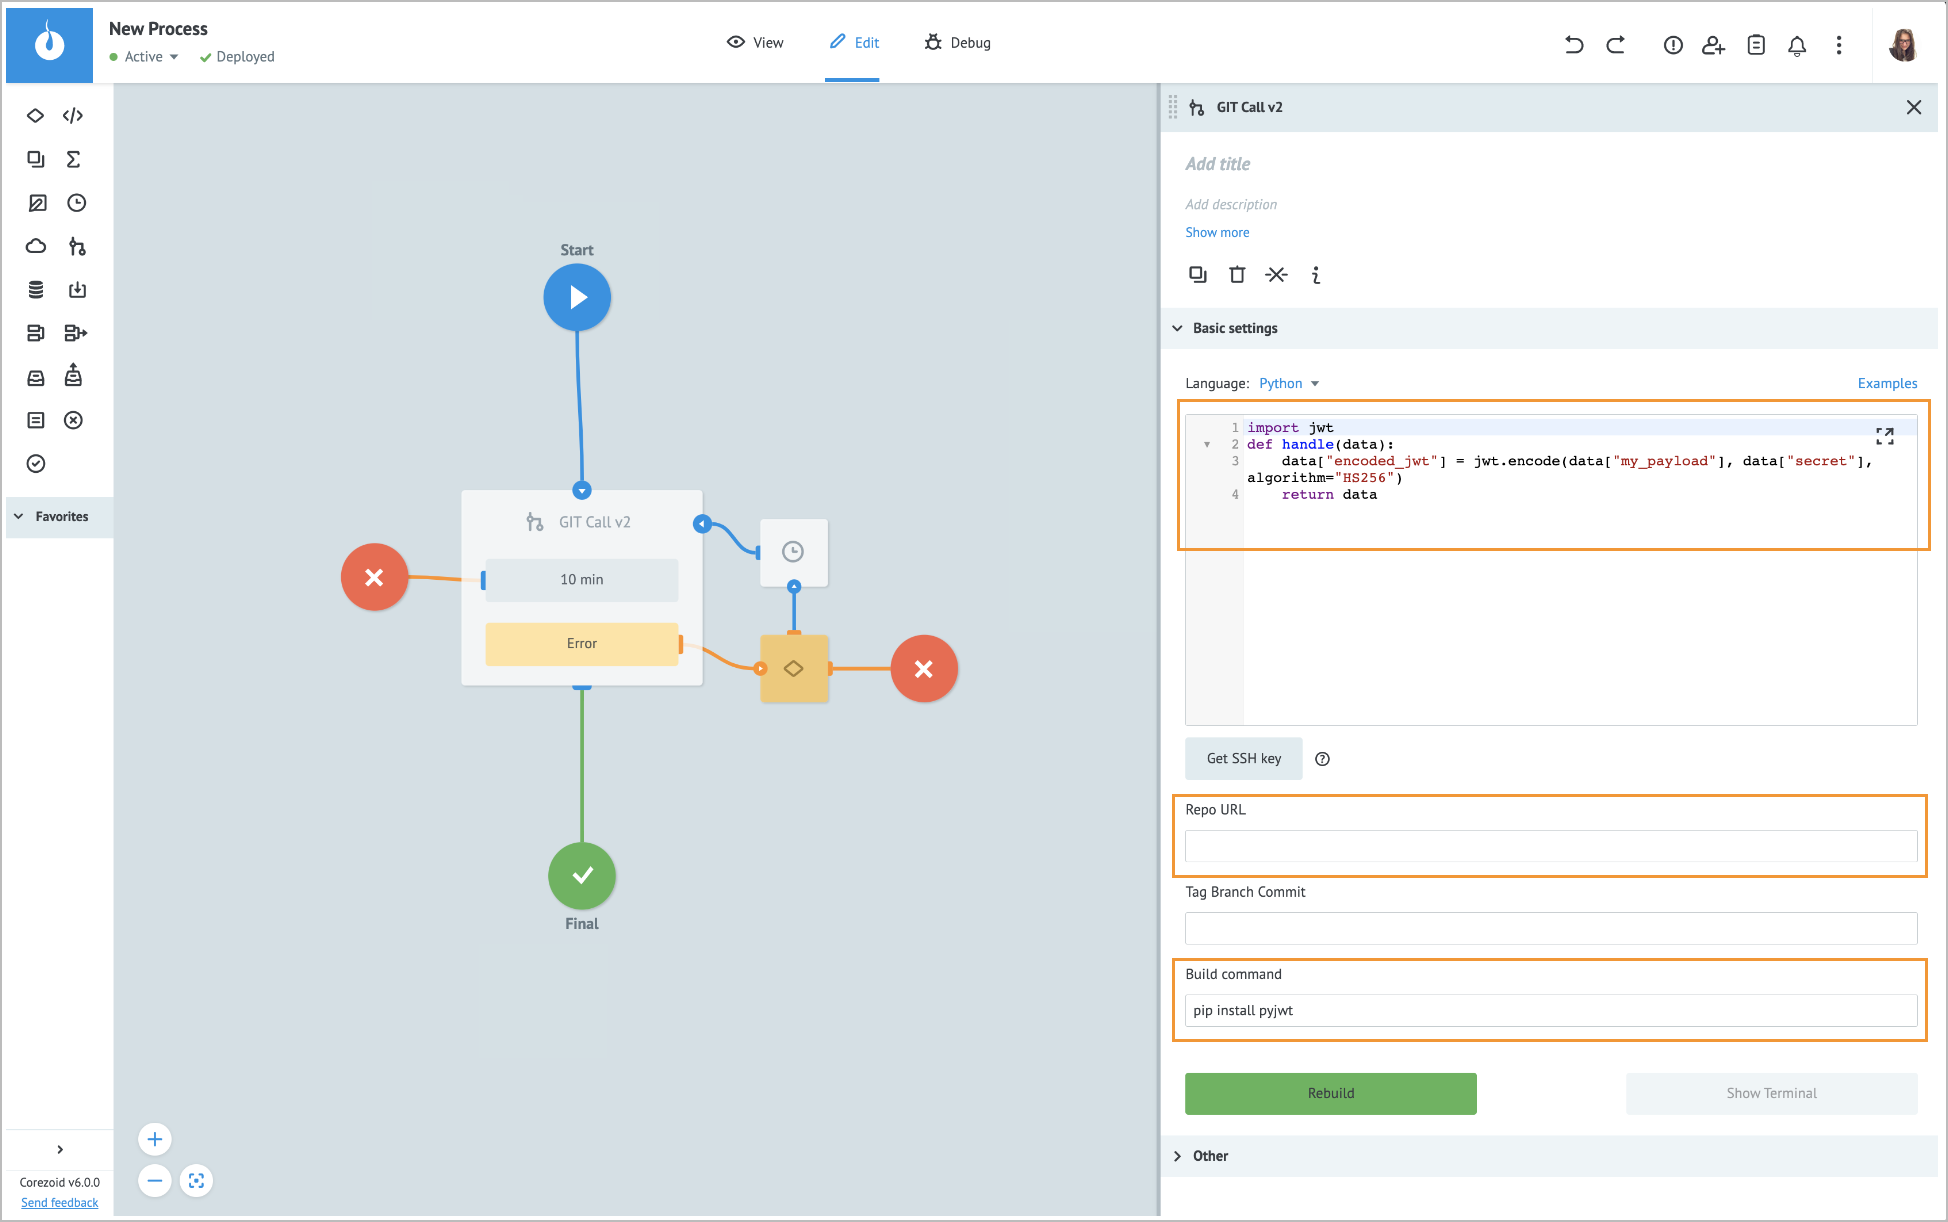
Below, you can see the example of the Git Call node used to install a library and write code that uses it.

When writing your code:
- Place your code inside the handle function, which uses the data parameter containing the task parameters as an input.
- Since Python represents JSON objects as dictionaries, use dictionary syntax when accessing and manipulating the task parameters within the data variable.
See the GitHub example.
Using Dockerfile
An example of using Dockerfile in Git Call for Python:
1. Repository Structure:
/your-repo
  ├── Dockerfile
  ├── src/
  │      └── main.py
  │      └── usercode.py
  ├── .gitignore
  ├── Dockerfile
  ├── requirements.txt
2. Dockerfile:
# Use Python Alpine as builder
FROM python:3.12-alpine as builder

# Set working directory
WORKDIR /app

# Copy and install requirements
COPY requirements.txt requirements.txt
RUN pip install -r requirements.txt

# Copy application code
COPY src src

# Create user with ID 501 (required by Git Call)
RUN addgroup --gid 501 usercode && \
    adduser --disabled-password \
    --gecos "" \
    --shell /usr/sbin/nologin \
    --ingroup usercode \
    --uid 501 \
    usercode

# Switch to usercode
USER usercode

# Set the entry point
ENTRYPOINT fastapi run src/main.py --host=0.0.0.0 --port="$GITCALL_PORT"
3. requirements.txt:
fastapi==0.111.0
4. main.py:
import time
import logging
from fastapi import FastAPI, Body
from usercode import handle

logger = logging.getLogger('uvicorn.error')
logger.setLevel(logging.DEBUG)

app = FastAPI()

@app.post("/")
def request(req = Body()):
    jsonrpc = req["jsonrpc"]
    id = req["id"]
    params = req["params"]
    try:
        logger.info("[req] time=%d id=%s" % (round(time.time() * 1000), id))
        result = handle(params)
        logger.info("[res] time=%d id=%s" % (round(time.time() * 1000), id))
        return {"jsonrpc": jsonrpc, "id": id, "result": result}
    except Exception as err:
        logger.info("[res] time=%d id=%s error=%s" % (round(time.time() * 1000), id, str(err)))
        return {"jsonrpc": jsonrpc, "id": id, "error": {"code": 1, "message": str(err)}}
5. usercode.py:
# write your code here
def handle(data):
    data["python"] = "Hello, world!"
    return data
6. Local testing commands:
# Build the Docker image
docker build -t gitcall-stats .

# Run the container
docker run -p 8080:8080 -e GIT_CALL_PORT=8080 --read-only gitcall-stats

# Test with curl
curl -X POST -H "Content-Type: application/json" -d '{
  "jsonrpc": "2.0",
  "method": "handle",
  "params": {
    "task_data": {
      "numbers": [1, 2, 3, 4, 5],
      "operation": "mean"
    }
  },
  "id": "1"
}' http://localhost:8080
7. Git Call Setup:
- Repository URL: Your repository URL
- Path to Dockerfile: /Dockerfile.
Error handling & troubleshooting
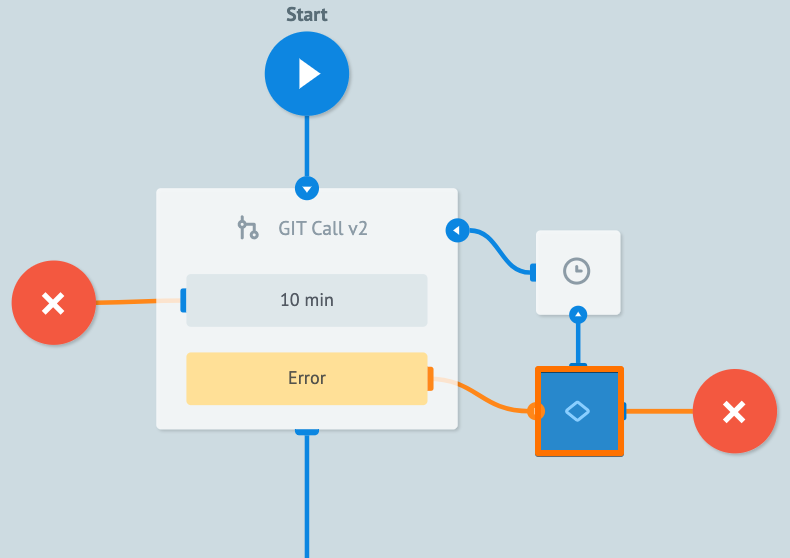
When an error occurs in the Git Call node, a task goes to the auxiliary Condition output node that is used for storing error parameters.

When an error occurs during the task processing, you may see the following error parameter names in the task.
| Error parameter name | Error type |
|---|---|
__conveyor_git_call_return_type_error__ | Hardware (system error), Software (error in a node logic/settings). |
__conveyor_git_call_return_type_tag__ | *Error tag. |
__conveyor_git_call_return_type_description__ | Error description in human-readable language; can be static or dynamic. |
*The error tag __conveyor_git_call_return_type_tag__ may have the following values.
| Value | Cause | Solution |
|---|---|---|
| git_call_return_format_error | Incorrect response format from the Git Call node. | Contact the support team for further assistance. |
| git_call_executing_error | An incorrect code has been returned from the Git Call node. | Contact the support team for further assistance. |
| git_call_is_not_supported | The Git Call node you are using has the version 1, which is no longer supported. | Use the Git Call node version 2. |
| code_return_size_overflow | The size of your code exceeds the specified limit set for your environment. | Reduce the size of your code. |
| git_call_fatal_error | A hardware error has occurred. | Contact the support team for further assistance. |
When working with your Process, you may encounter the following issues.
| Issue | Cause | Solution |
|---|---|---|
| The build fails. | To use the repository, root access is required. | Corezoid does not permit access to the root directory. If your code requires root access, you need to modify it to work within the allowed directory structure or you can contact us to discuss custom solutions. |
| The repository requires C/C++. | By default, Git Call does not support C/C++. If you need access to this feature, please contact our support team. | |
| There is no internet access. | Git Call requires internet access to retrieve code from an online repository. It doesn’t function in a closed offline environment. |


