Extend bot functionality
- 07 Jun 2024
- 3 Minutes to read
- Contributors

- Print
- DarkLight
- PDF
Extend bot functionality
- Updated on 07 Jun 2024
- 3 Minutes to read
- Contributors
- Print
- DarkLight
- PDF
Article summary
Did you find this summary helpful?
Thank you for your feedback
To extend bot functionality, you have to:
1. Add new command
Very often for granting access to features and data, it is necessary to receive a user’s data and to confirm the user’s personality – authorize the user. The most common method is to get the user’s phone number and to send a one-time password (OTP) in an SMS, but we’ll use the native phone-sharing features of messengers to authorize the user.
To extend the standard bot features with a new command – authorization by phone number – go to the Sample Bots folder and create a new /auth process. This new Process has only two standard nodes, which we will fill with logic later.
2. Set Communications Orchestrator up
To add the authorization logic, we need to change some standard Communications Orchestrator Processes. Below, you can see the general algorithm of the authorization process.

Commands
Each bot consists of a set of features. In the Communications Orchestrator paradigm, each feature is a single Process that can be launched via commands. The launching command template is the following: / {{commandName}}.
A Process is launched by the Router process, which refers to the Commands State Diagram for retrieving command: process_id data binding, where process_id is the ID of a process to be launched.
According to the template, the command launching authorization feature (Process) will have the /auth name. To empower the /auth command to launch the authorization process, add to the Commands State Diagram a task that will keep the corresponding /auth: process_id binding.
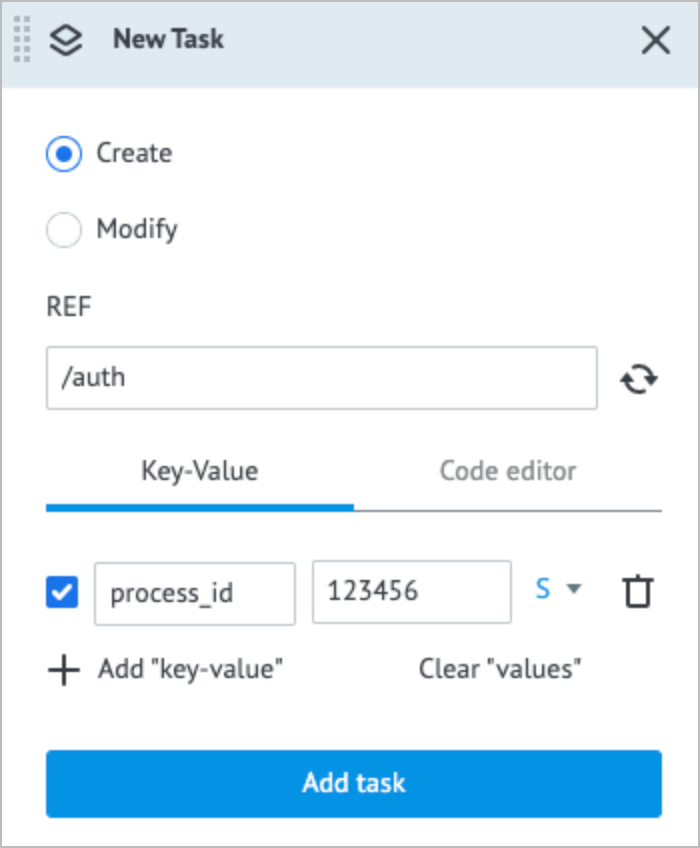
To create the binding, add a configuration task:
In the Configs folder, open the Commands State Diagram.
Switch to the View mode.
Click + New task.
Fill in the new task parameters:
- Enter /auth (the command name) in the REF field.
- Enter the ID of the /auth process in the Key-Value fields.
- Click Add task.

Now, sending the /auth command to the bot allows the Router Process to receive the ID of the /auth process from the Commands State Diagram and, consequently, to launch the /auth process.
Localization
A conversation with a bot follows the question-answer pattern. To receive a user’s phone number, the bot must ask the user for it, and the user must give it.
To edit the task with texts in the Localization State Diagram, add to the task the following texts of the message and the button requesting a phone number:
    {
            "askPhone": {
                "ru": "Пожалуйста, нажмите кнопку для отправки номера телефона",
                "uk": "Будь ласка, натисніть кнопку для відправки номера телефону",
                "en": "Please press the button to share your phone number"
            },
            "sharePhone": {
                "ru": "Отправить мой номер телефона",
                "uk": "Надіслати мій номер телефону",
                "en": "Share my phone number"
            }
        }
Attachments
The messengers provide the ability to receive a phone number if a user clicks the corresponding button.
| Messenger | Parameter | Button example |
|---|---|---|
| Viber | "ActionType":"share-phone" | {"Columns": 6,"Rows": 1,"BgColor": "#F3F3F3","Text": "{{t'sharePhone}}","ActionType": "share-phone","ActionBody": "phone"} |
| Telegram | "request_contact":true | {"request_contact": true,"text": "{{t'sharePhone}}"} |
| Facebook Messenger | "content_type":"user_phone_number" | {"content_type": "user_phone_number"} |
To use this ability, add to the Attachments State Diagram a template of an attachment with two buttons:
- Share phone number
- Exit to the main menu
Thus, you need to add to the Attachments State Diagram a new task with the following content:
REF: sharePhone
       {
            "facebook": {
                "type": "quick_replies",
                "buttons": [{
                        "content_type": "user_phone_number"
                    },
                    {
                        "content_type": "text",
                        "title": "{{t'/exit}}",
                        "payload": "/exit"
                    }
                ]
            },
            "telegram": {
                "type": "keyboard",
                "buttons": [
                    [{
                        "request_contact": true,
                        "text": "{{t'sharePhone}}"
                    }],
                    [{
                        "text": "{{t'/exit}}"
                    }]
                ]
            },
            "viber": {
                "type": "keyboard",
                "buttons": [{
                        "Columns": 6,
                        "Rows": 1,
                        "BgColor": "#F3F3F3",
                        "Text": "{{t'sharePhone}}",
                        "ActionType": "share-phone",
                        "ActionBody": "phone"
                    },
                    {
                        "Columns": 6,
                        "Rows": 1,
                        "BgColor": "#F3F3F3",
                        "Text": "{{t'/exit}}",
                        "ActionType": "reply",
                        "ActionBody": "/exit"
                    }
                ]
            }
        }
Earlier, we used the sharePhone key to add the text of the button for sharing phone numbers to the Localization State Diagram. We will use this key for inserting the localized text in our buttons:
"text": "{{t'sharePhone}}"– for Telegram"Text": "{{t'sharePhone}}"– for Viber
When a user clicks this key, the Receiver Process of the corresponding messenger receives an object containing the user’s phone number, which can be used further for user authorization or other business processes.
Was this article helpful?