eSputnik
- 23 Aug 2024
- 7 Minutes to read
- Contributors

- Print
- DarkLight
- PDF
eSputnik
- Updated on 23 Aug 2024
- 7 Minutes to read
- Contributors
- Print
- DarkLight
- PDF
Article summary
Did you find this summary helpful?
Thank you for your feedback
Before you start working with eSputnik, you have to:
Register the domain for free: Connect your payment card (your account will be charged for 1 UAH and then replenished with this amount). Connecting a payment card with an account is only required for corporate emails.
Verify the nic.ua domain when registering using your corporate email. If you register with your personal mail, the default sender is the registration mail.
Overview
eSputnik is a service for launching email and SMS campaigns. Before integrating with eSputnik API, we recommend reading and understanding the documentation. This tutorial guides you through setting up a Corezoid process using the eSputnik API call to send emails and check their delivery status.
To learn more about eSputnik, get familiar with the following topics:
Register account
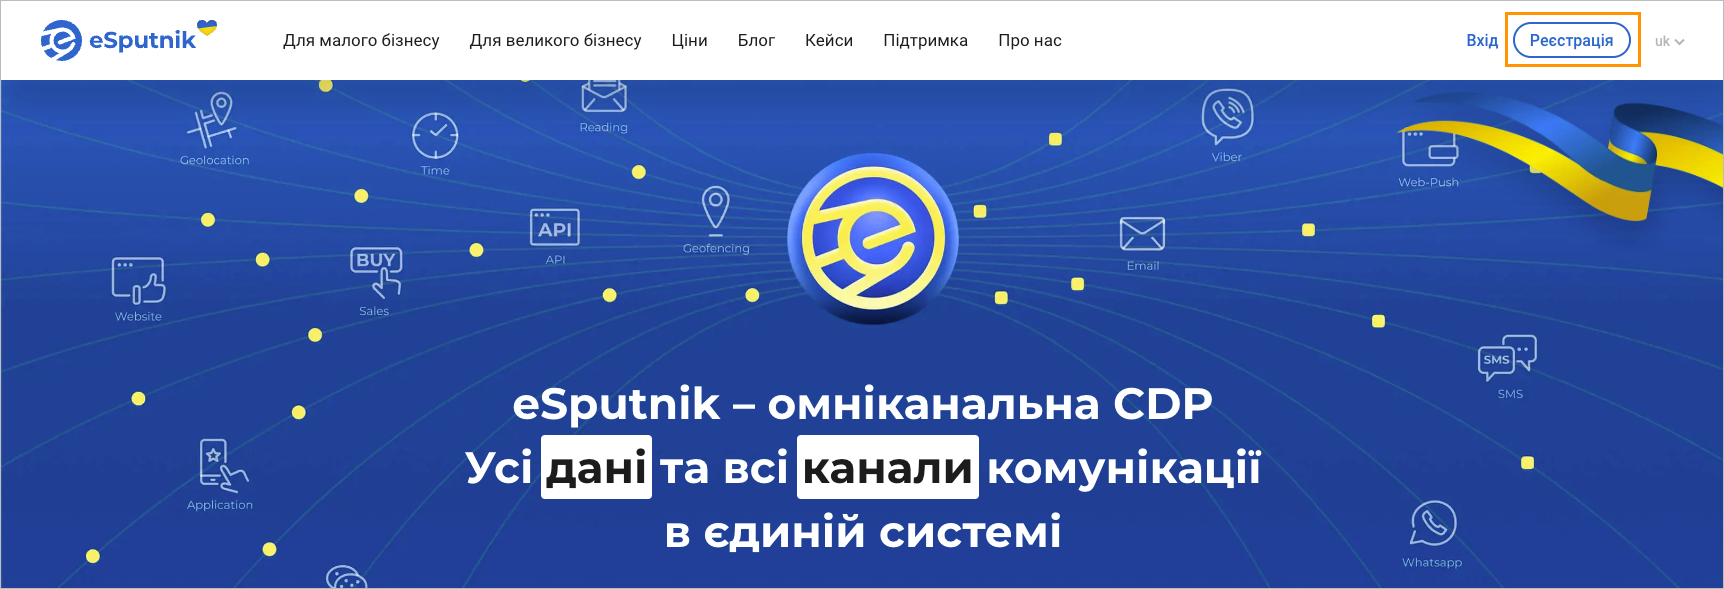
To register an account on eSputnik:
Go to https://esputnik.com/ and click Sign Up.
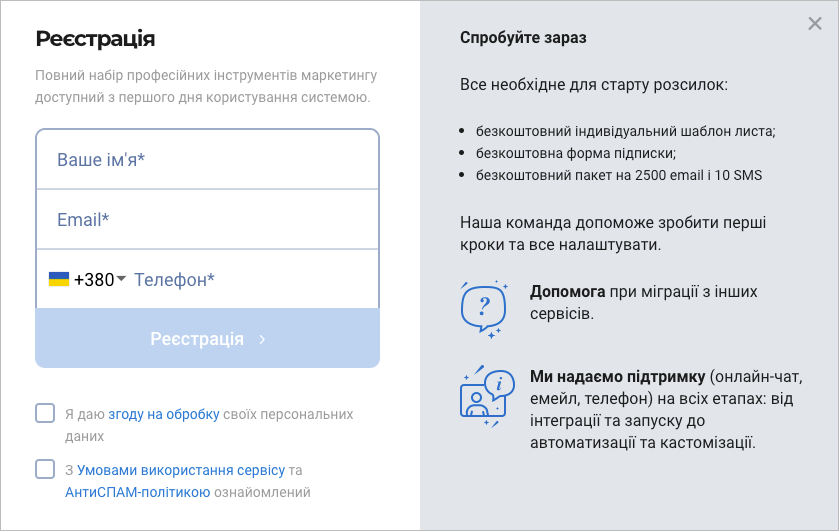
In the Registration dialog:
- Enter your name, email, and mobile phone number.
- Select the checkboxes to accept the processing of your personal data and confirm that you are familiar with the terms of use of the service and anti-spam policy.
- Click Register.
Click Check Your Gmail.
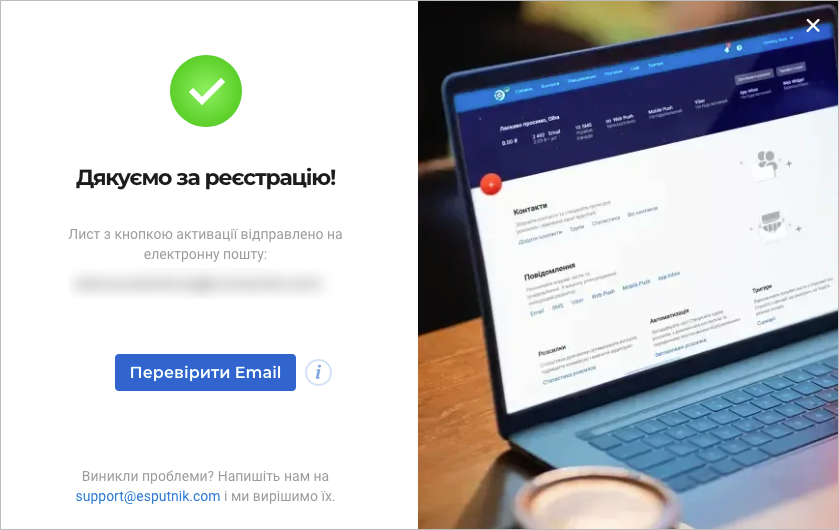
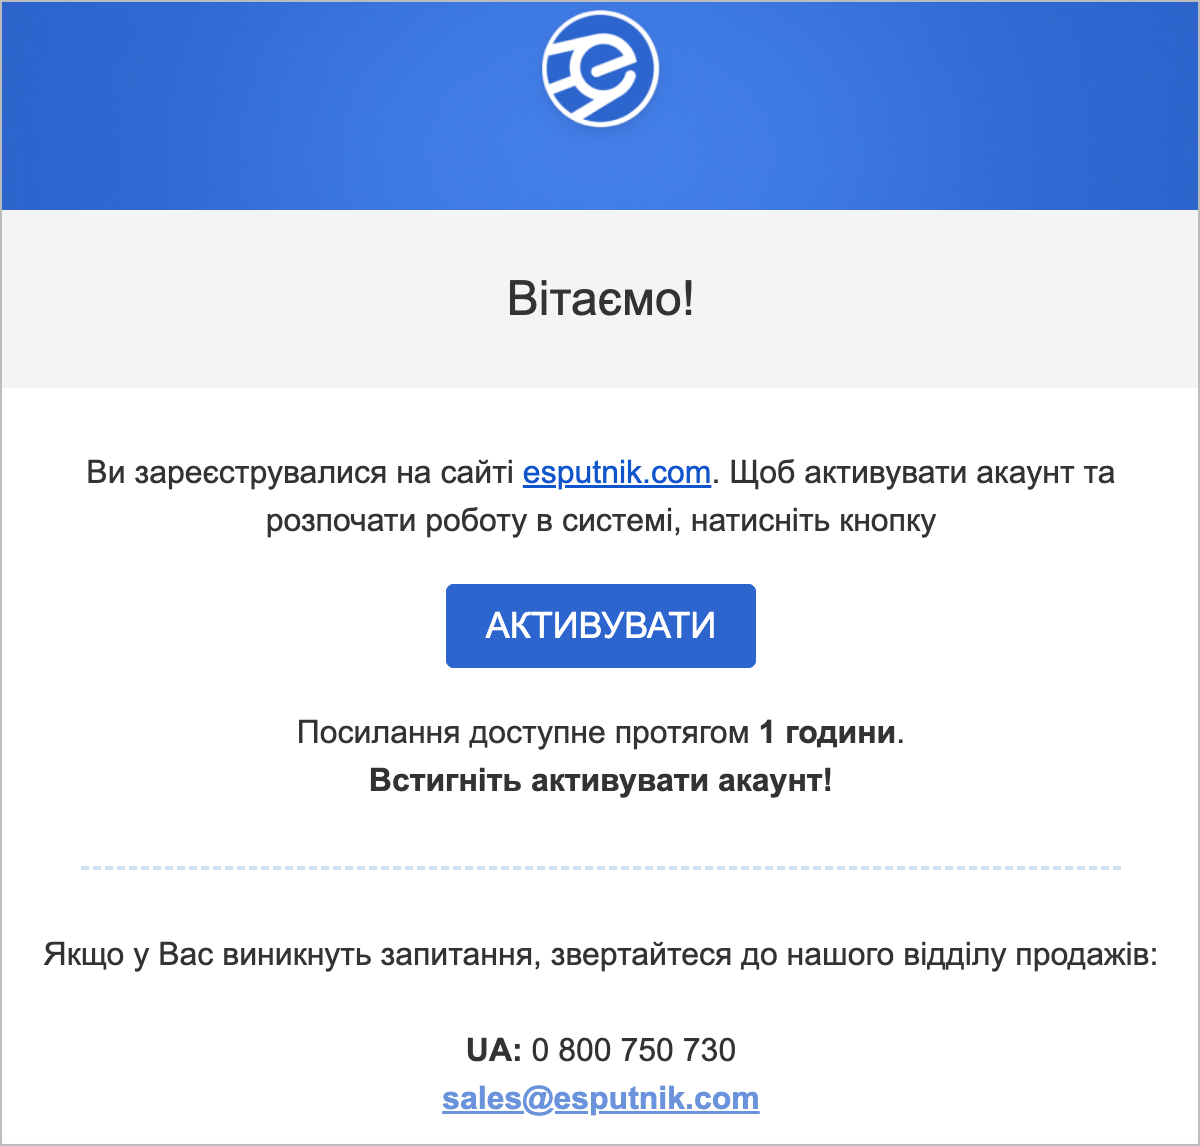
In your mailbox, find a message from eSputnik and click Activate.
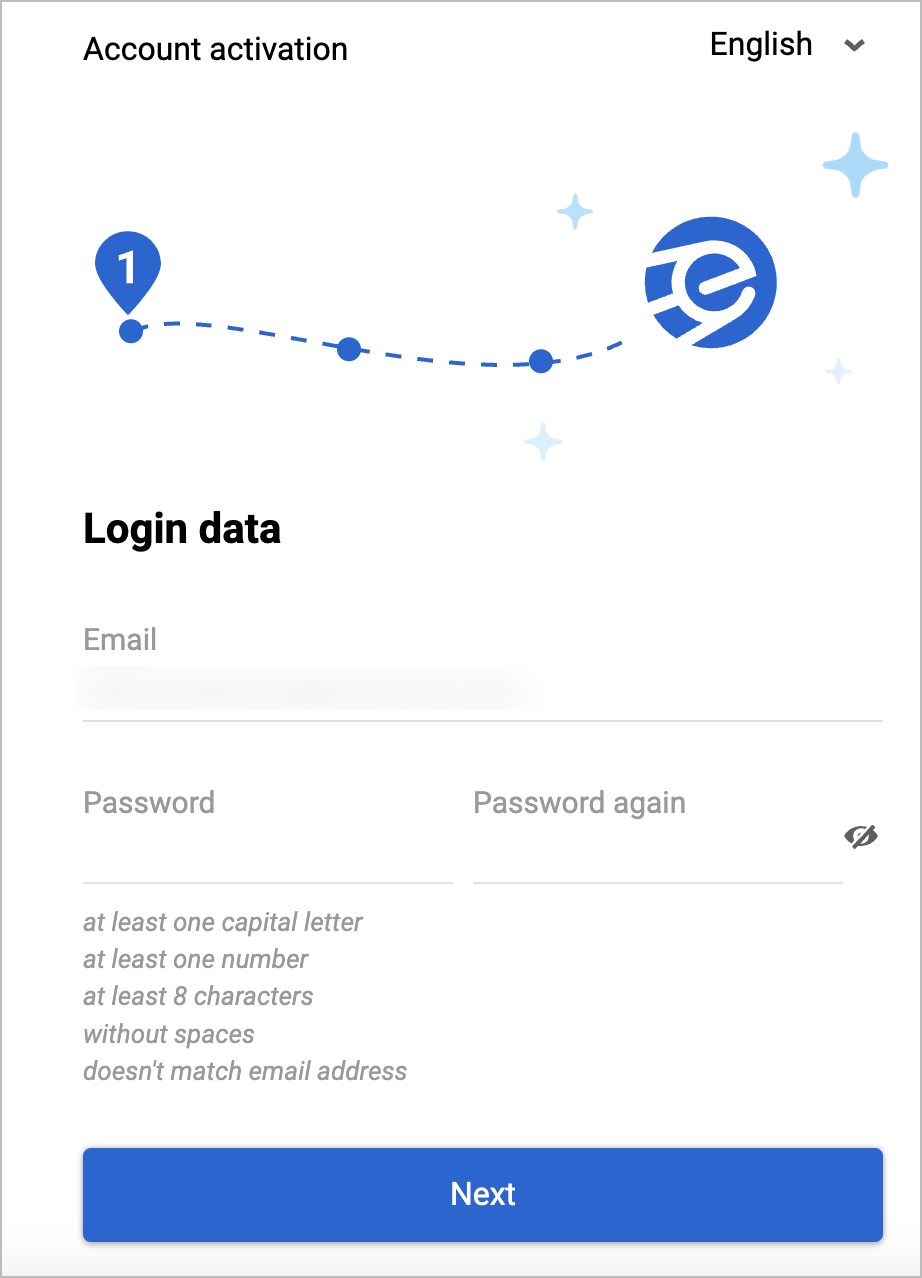
In the Login data dialog, enter your password in the Password and Password again fields and click Next.
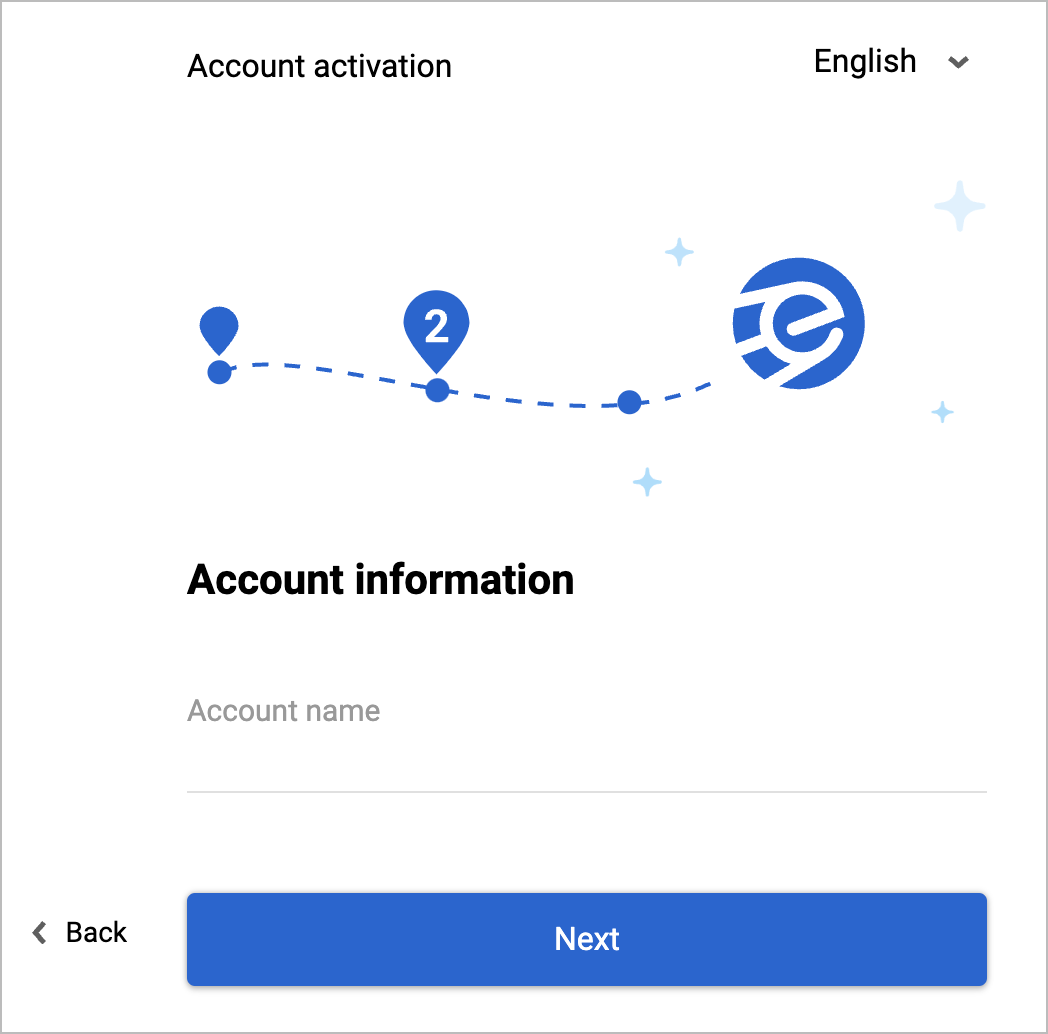
In the Account information dialog, enter your account name in the Account name field and click Next.
In the More options dialog:
a. Select a country in the Country dropdown list.
b. Select a currency in the Currency dropdown list.
c. Select a business type in the Business type dropdown list.
d. Select the needed checkbox(es) in Contact base source.
e. Select the number of contacts in Total number of contacts.
f. Click Activate account.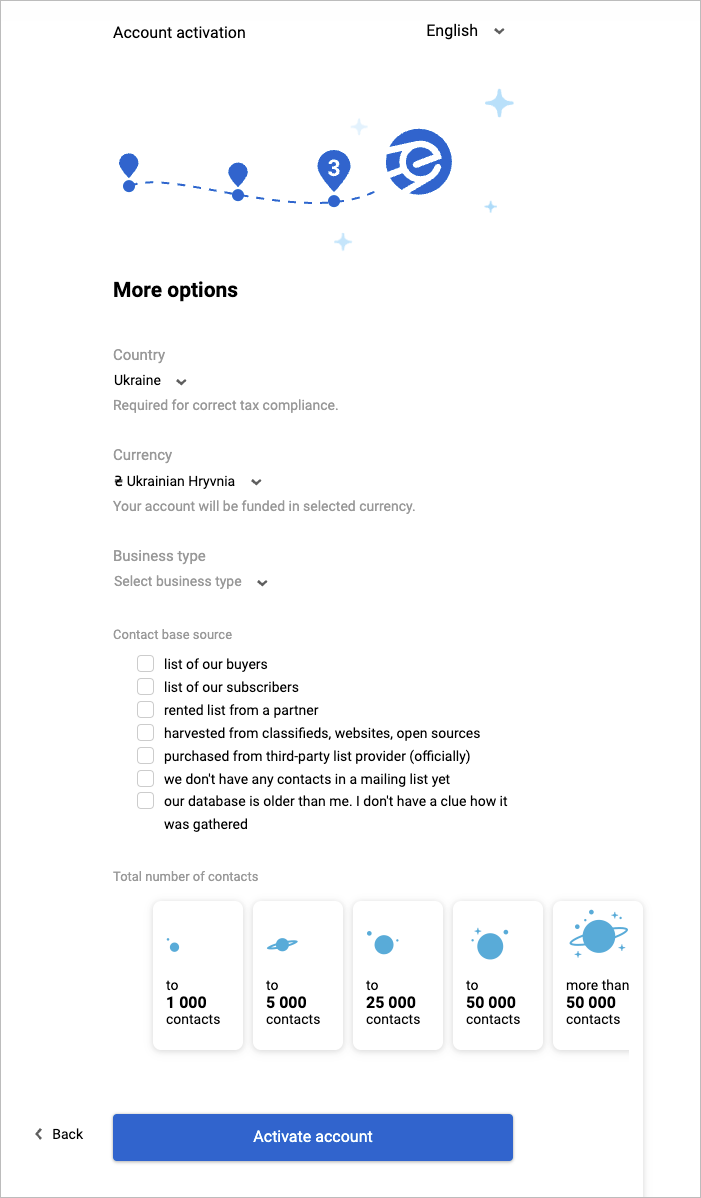


You have successfully registered your account on eSputnik.
Create email template
To create an email template:
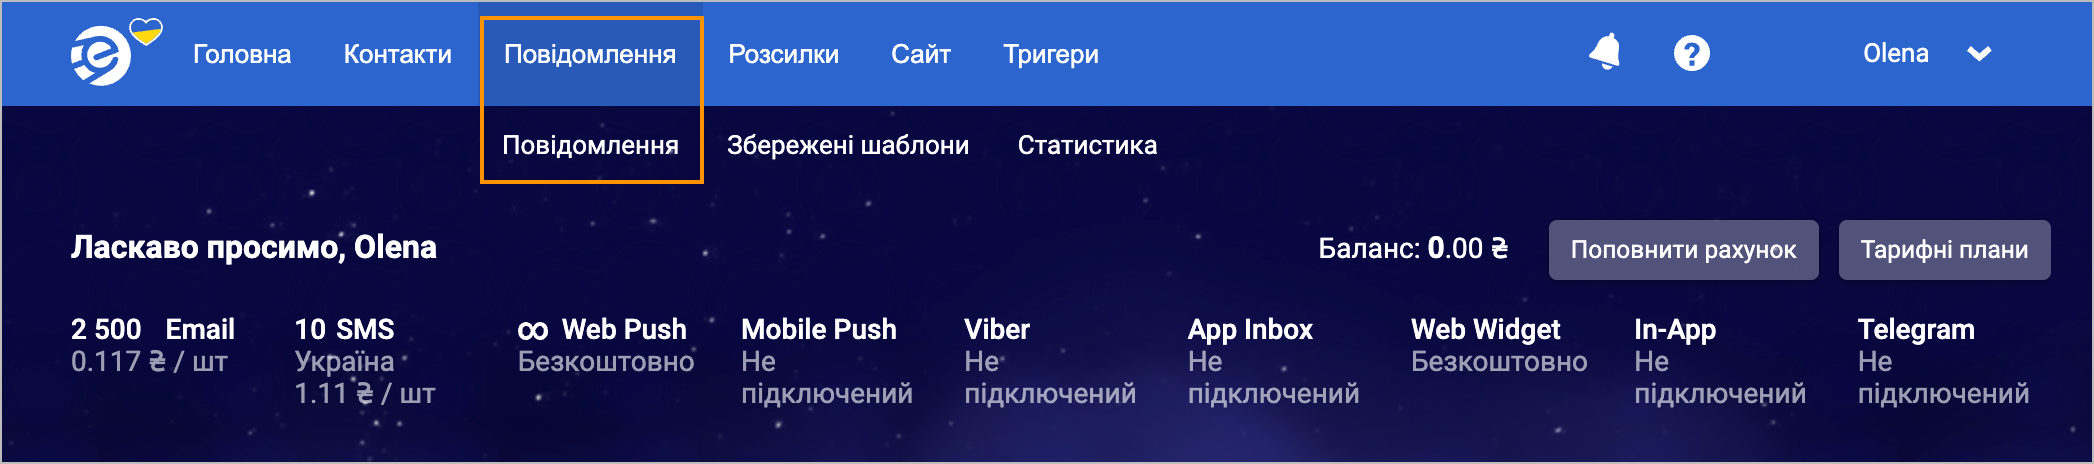
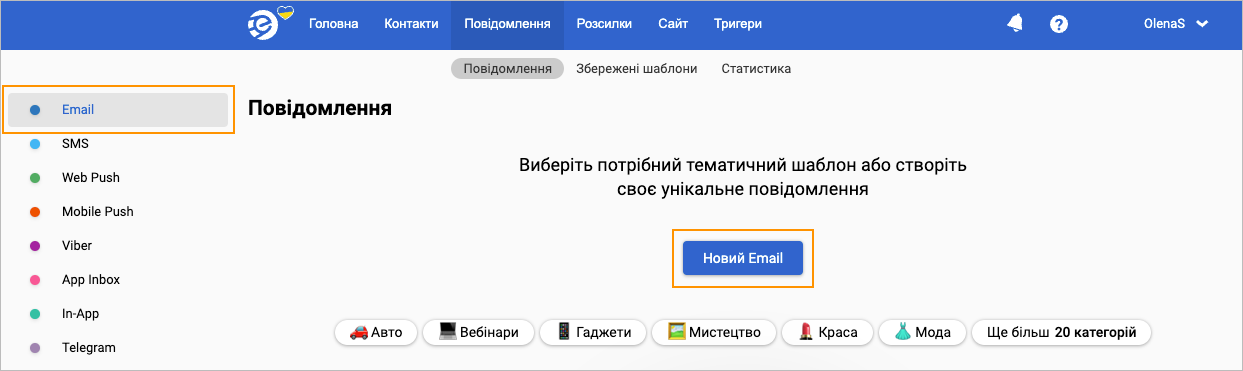
In the upper-left corner of the main page, click Messages and from the dropdown list, select Messages.
On the Email tab of the Messages page, click New Email.
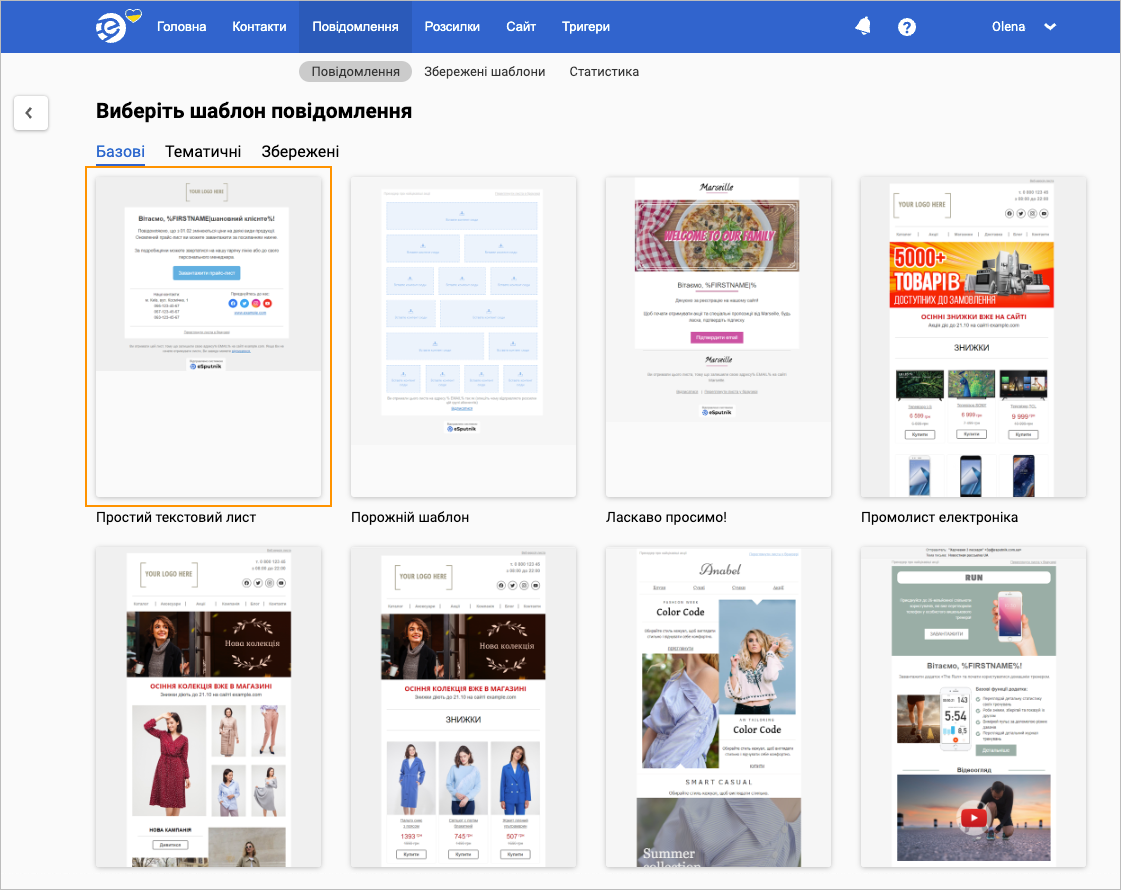
On the Select email template page, select the needed template.
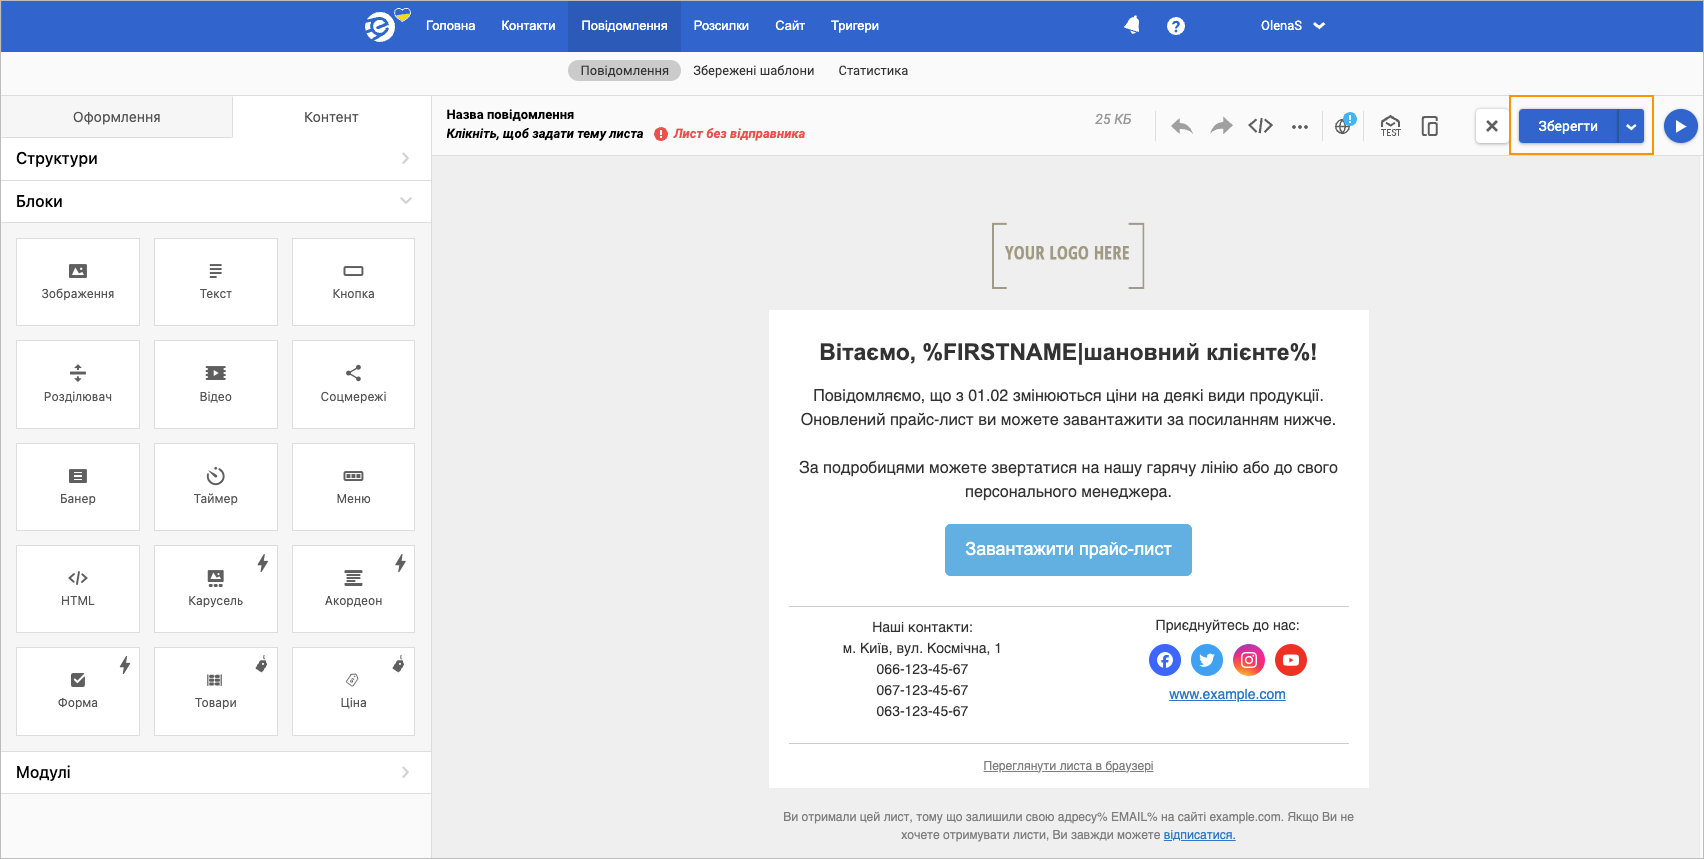
In the upper-right corner of the selected template, click Save.
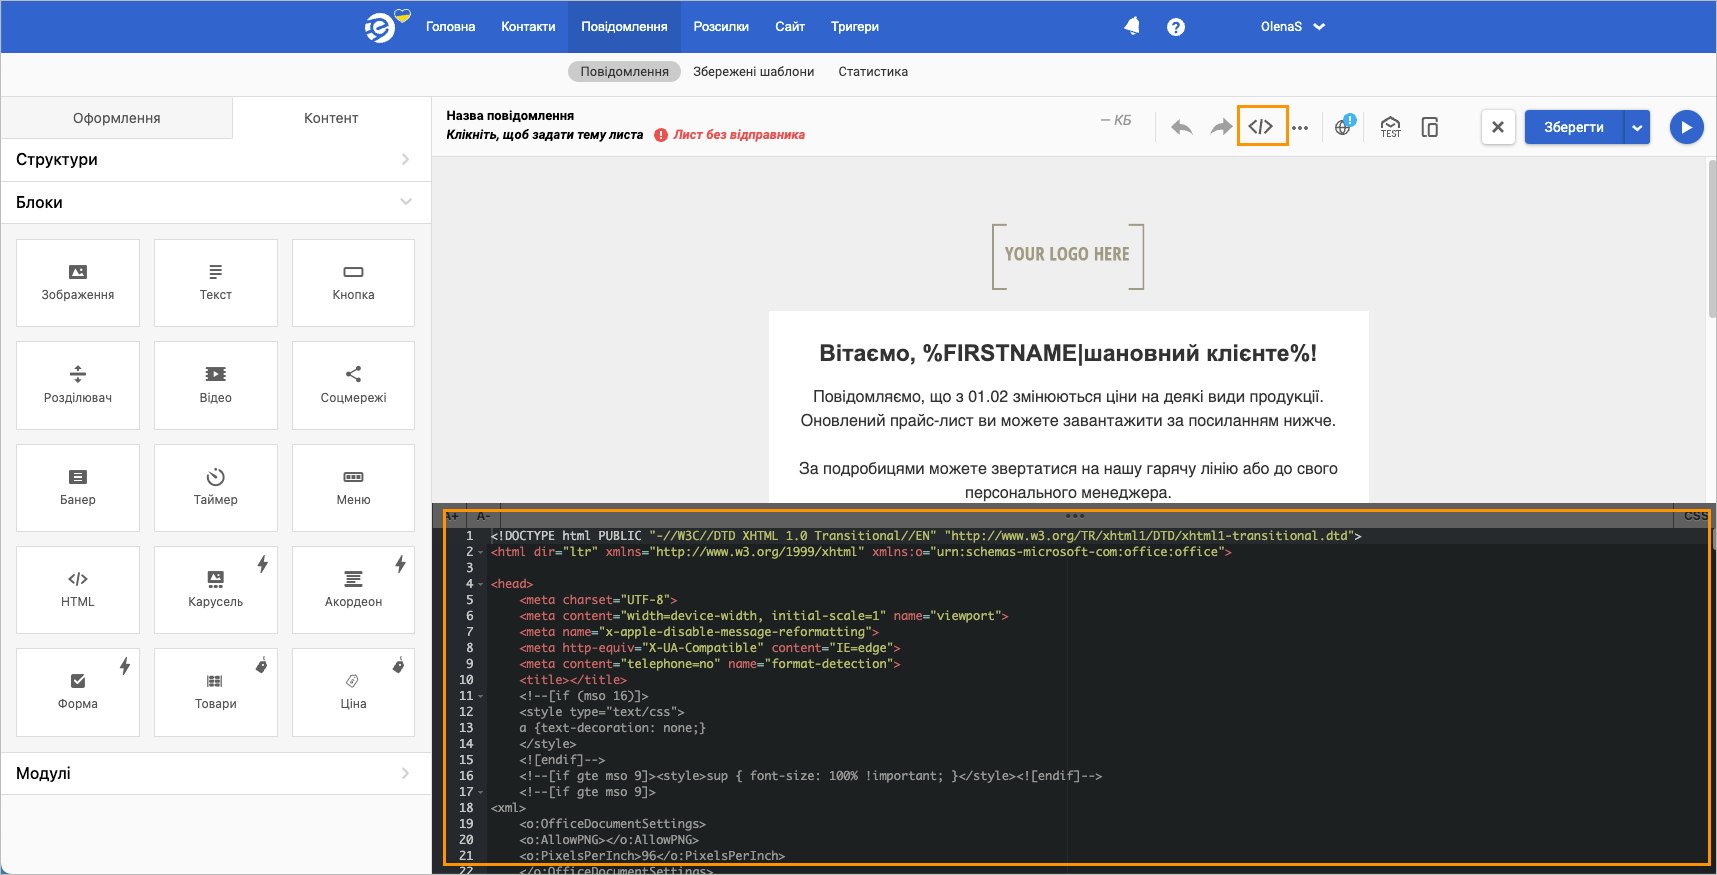
Click the code editing icon and copy the HTML code in one of the parameters to launch email sending.


You have successfully created an email template.
Send email via eSputnik
To send an email via eSputnik:
Go to https://admin.corezoid.com/, in the upper-left corner, click Create and in the dropdown list, select Folder.
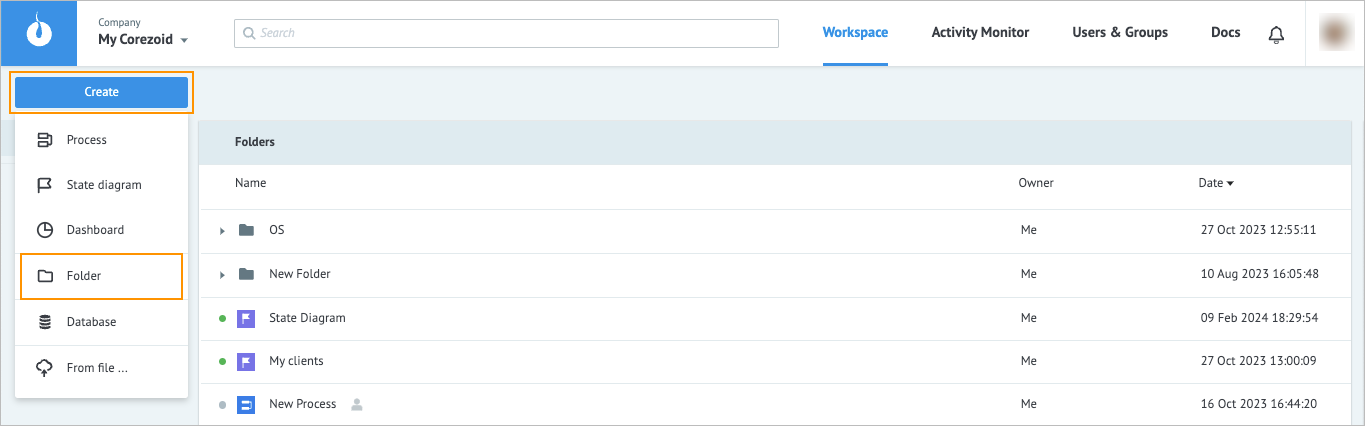
In the Create folder dialog, enter the eSputnik folder name and click Ok.

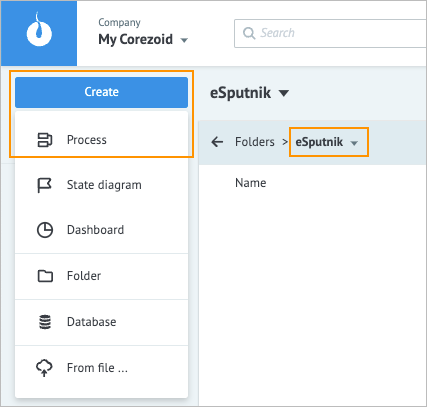
In the eSputnik folder, click Create and in the drop-down list, select Process.
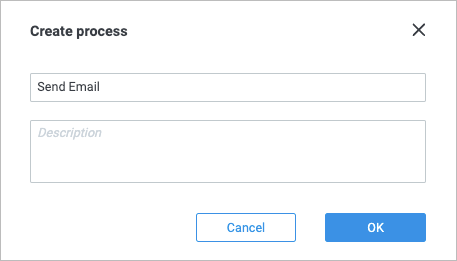
In the Create process dialog, enter the Send Email process name and click Ok.
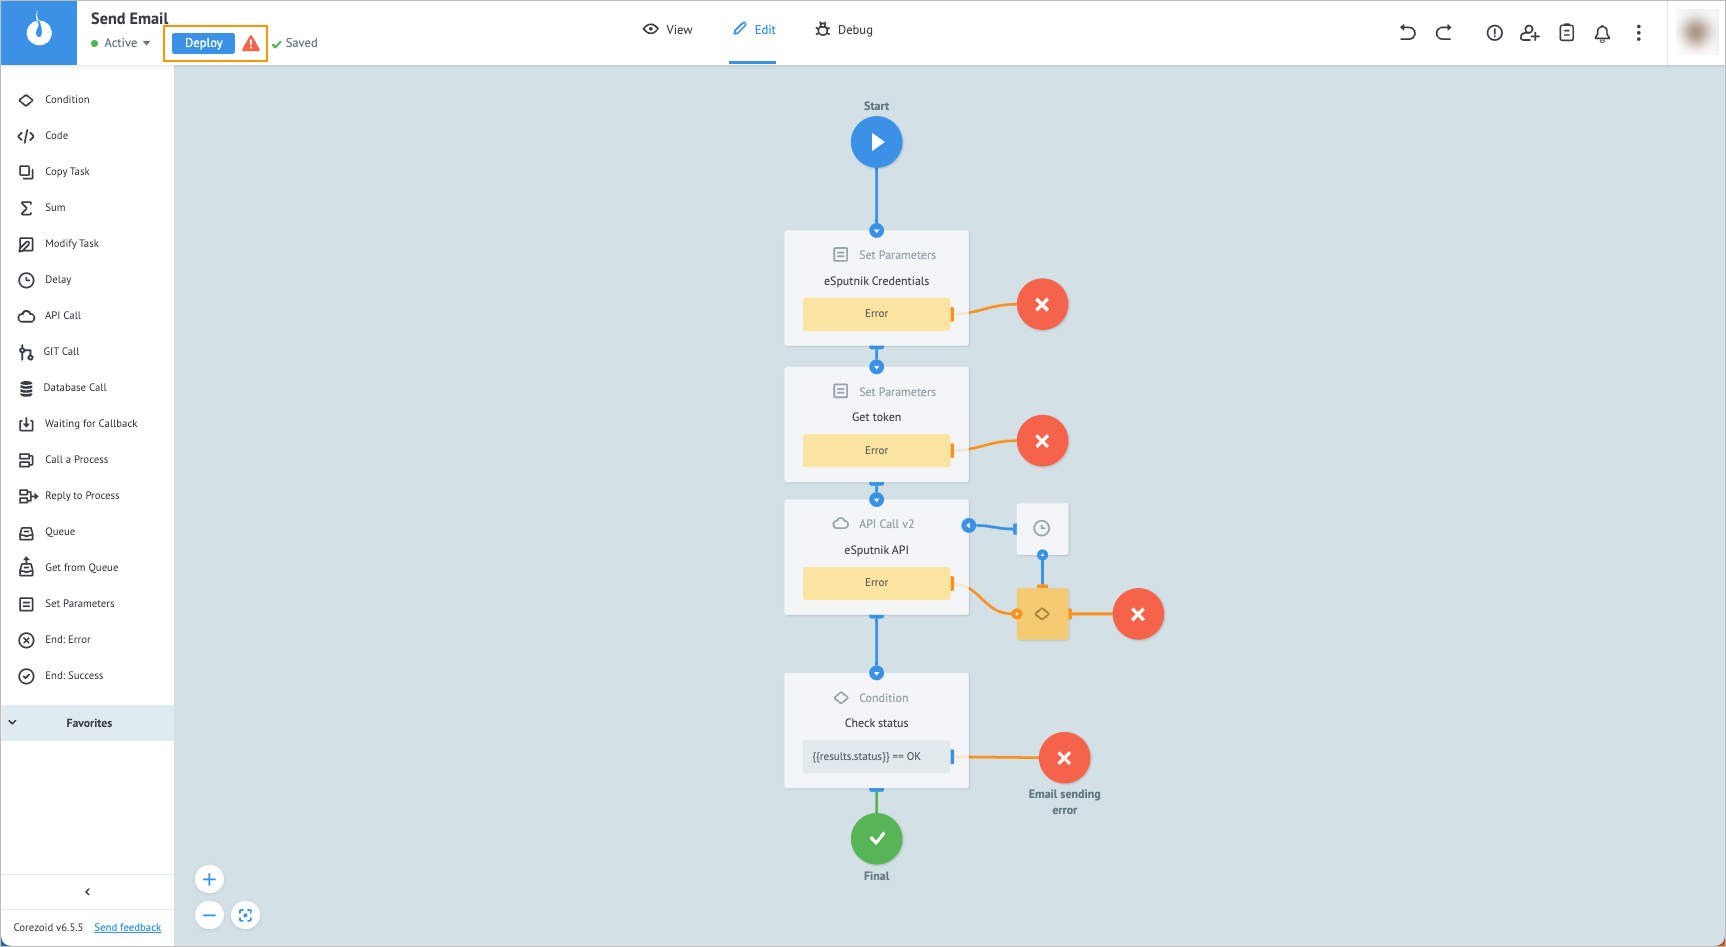
Note: The process will send an email to the user and check the delivery status of your email.
 {height="" width=""}
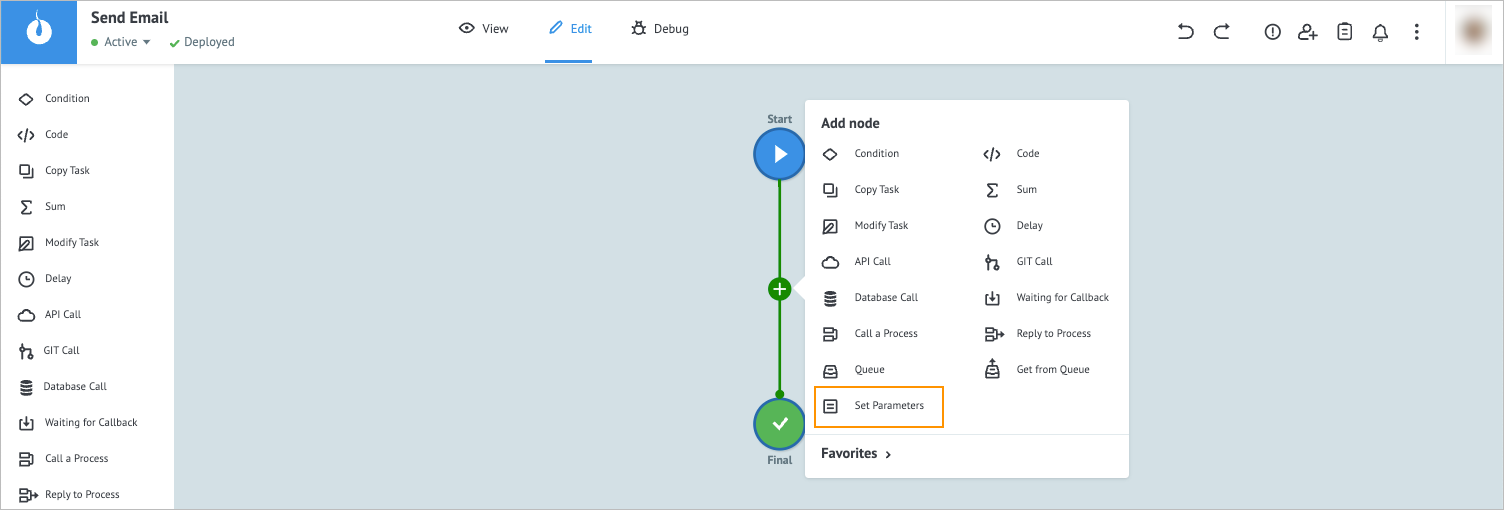
Note: Login and password for your account are used as a key to make a eSputnik API call.In the Send Email process, add the Set Parameters node.
Note: When adding a node, hover over the needed place in the process, click the plus that appears, and in the dropdown list, select the needed node name.
Note: With the Set Parameters node, you don’t have to enter your login and password with each API call.
Click the Set Parameters node and on its details panel, enter:
- eSputnik credentials in the Add title field.
- login and password in the Key fields to sign in on esputnik.com.
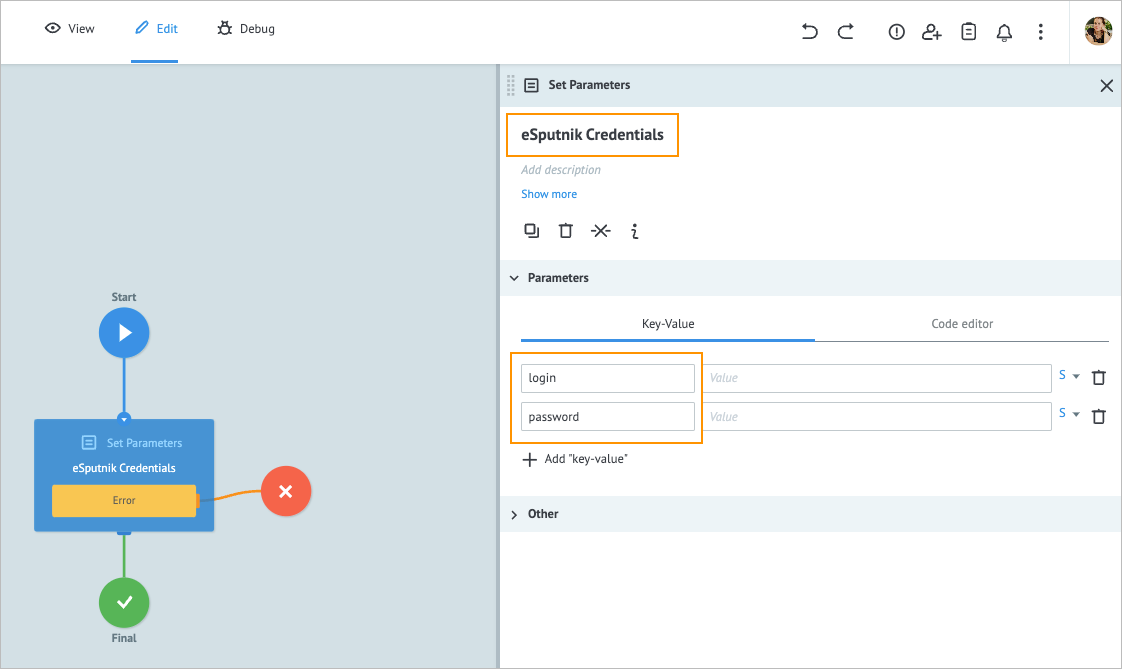
Add another Set Parameters node to the process and on its details panel, enter:
a. Get token in the Add title field.
b.tokenand$.base64_encode({{login}}:{{password}})in the Key and Value fields correspondingly.
Note: The token is generated by using the login and password values encoded in Base64.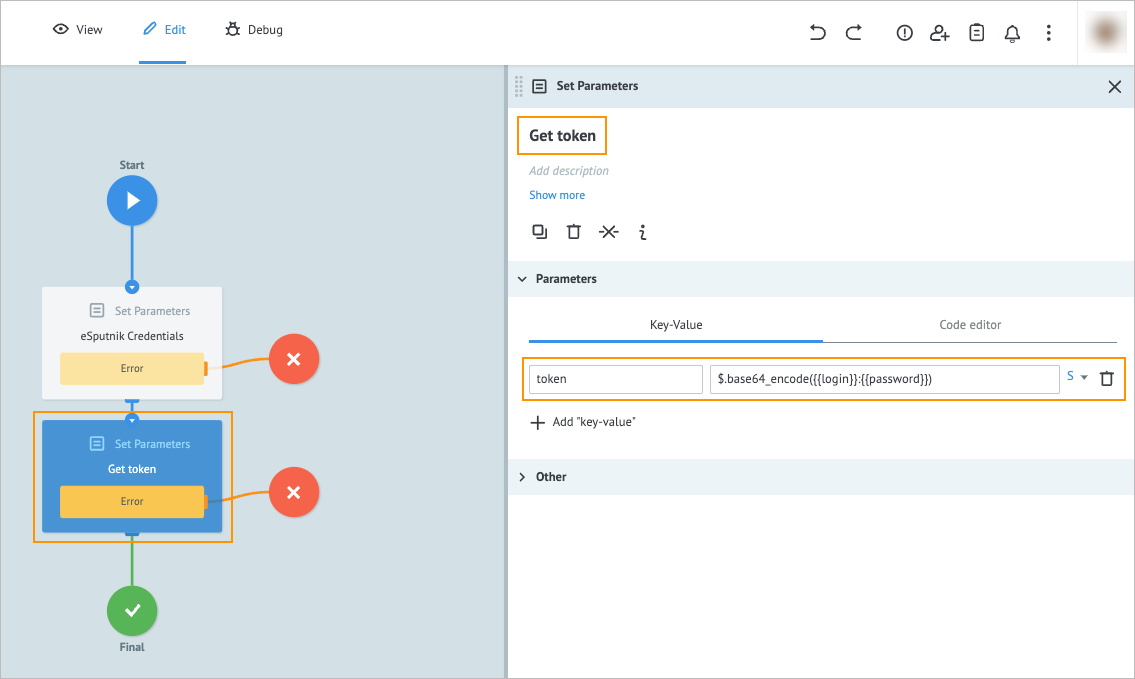
Add the API Call node to the process and on its details panel:
a. Enter eSputnik API in the Add title field.
b. Enter https://esputnik.com/api/v1/message/email in the URL field.
c. Select Default in the Request format dropdown list.
d. Select json in the Data format dropdown list.
e. Enter application/json; in the Content-Type field.
f. Enter plainText, emails, from, subject, and htmlText in the Key fields.
g. Enter{{plainText}},{{emails}},{{from}},{{subject}}, and{{htmlText}}in the Value fields.
h. Select the Header parameters checkbox and enterAuthorizationandBasic {{token}}in the Key and Value fields below correspondingly.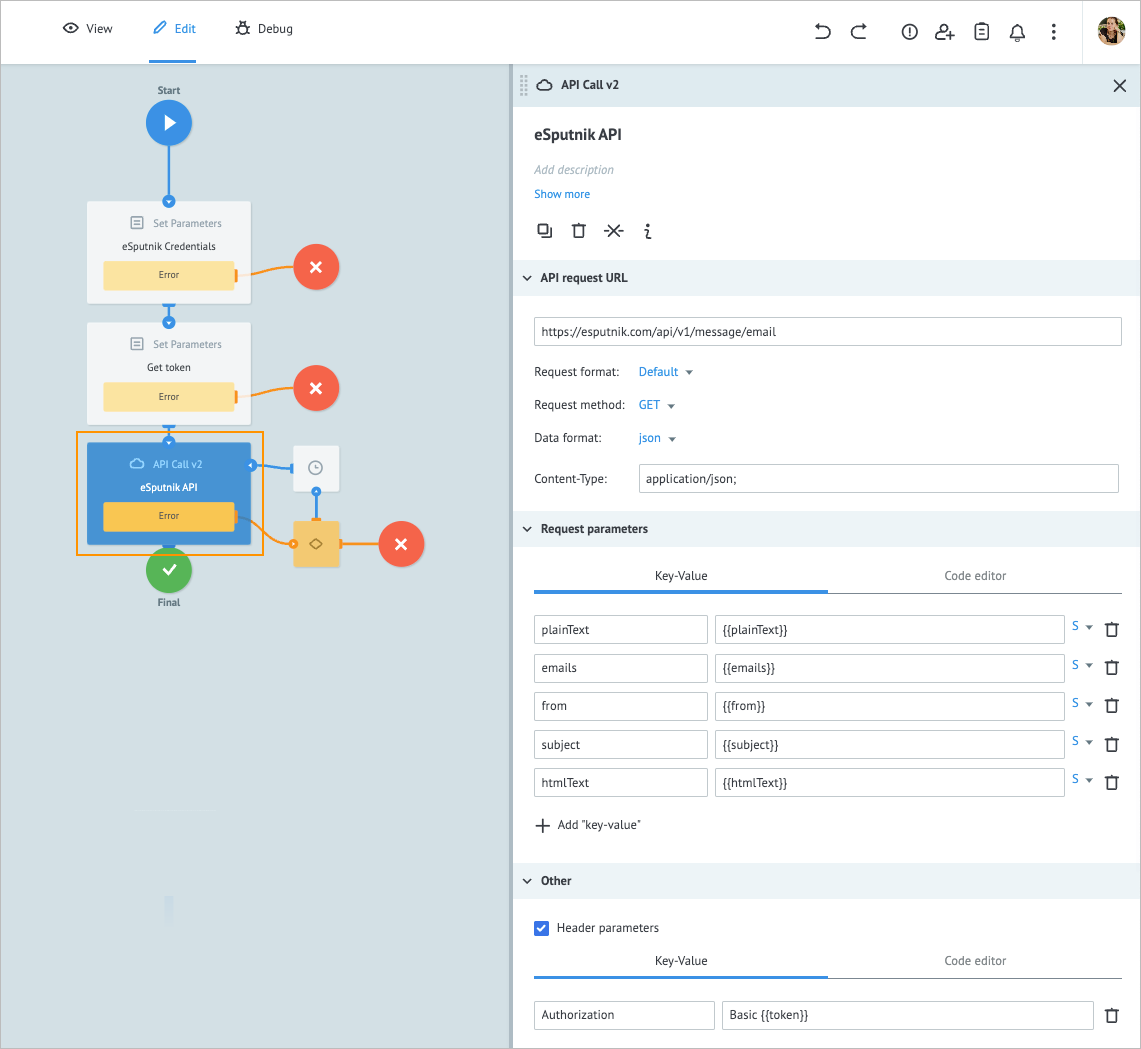
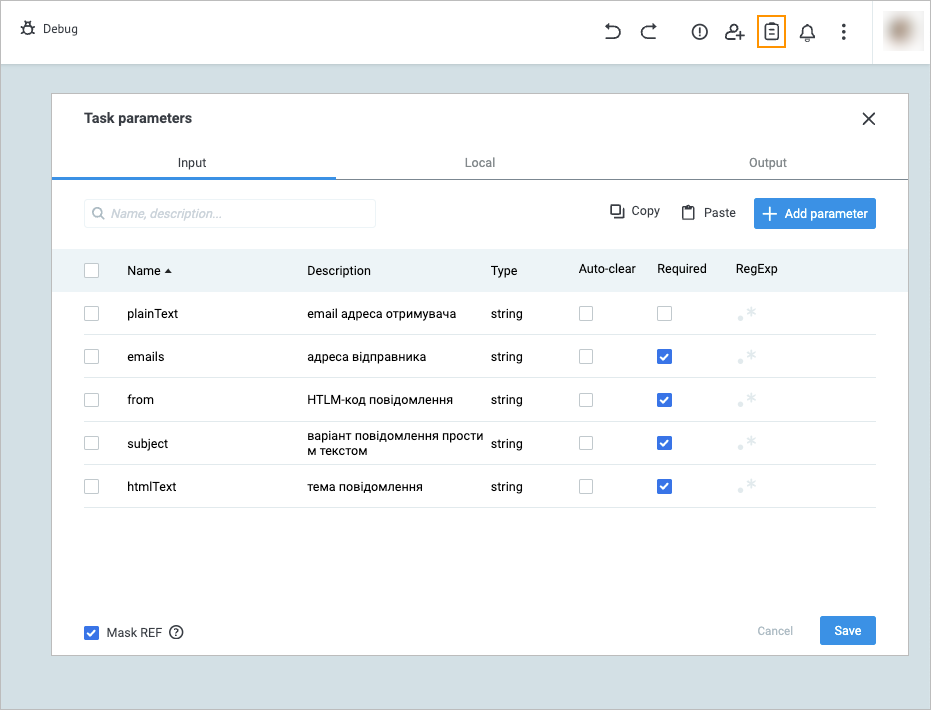
In the upper-right corner, click the task parameters icon and in the Task parameters dialog:
Add the following parameters by clicking + Add parameter:
- plainText with the email адреса отримувача description
- emails with the адреса відправника description
- from with the HTML-код повідомлення description
- subject with the варіант повідомлення простим текстом description
- htmlText with the тема повідомлення description
Select the Required checkbox next to the emails, from, subject, and htmlText parameters.
Click Save.
Note: You have to add the parameters to ensure that the parameters are filled in automatically each time when you send a request manually.
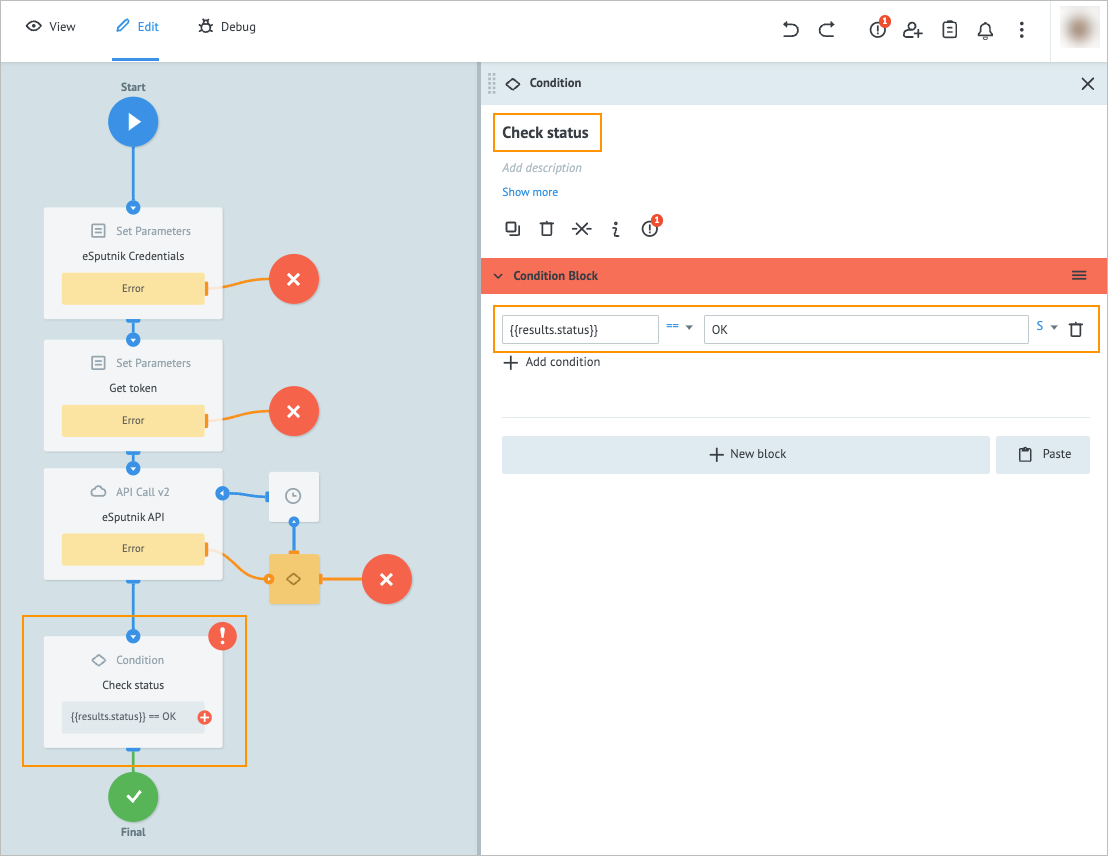
Add the Condition node to the process and on its details panel, enter:
a. Check status in the Add title field.
b.{{results.status}}in the Key field.
c. Ok in the Value field.Note: This node is needed to check the sending status of your email.
Add the End node to the Condition node:
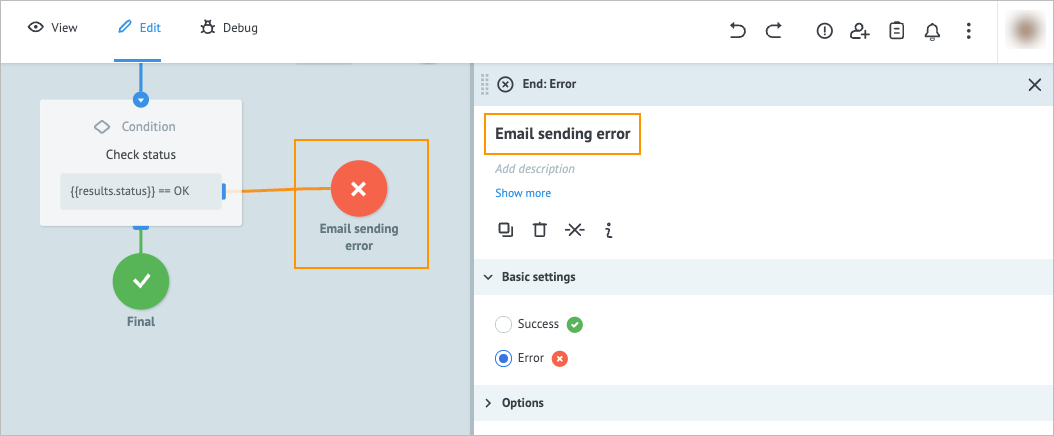
On the right side of the Condition node, click the plus icon, drag it to the right side, and from the dropdown list, select End: Error.
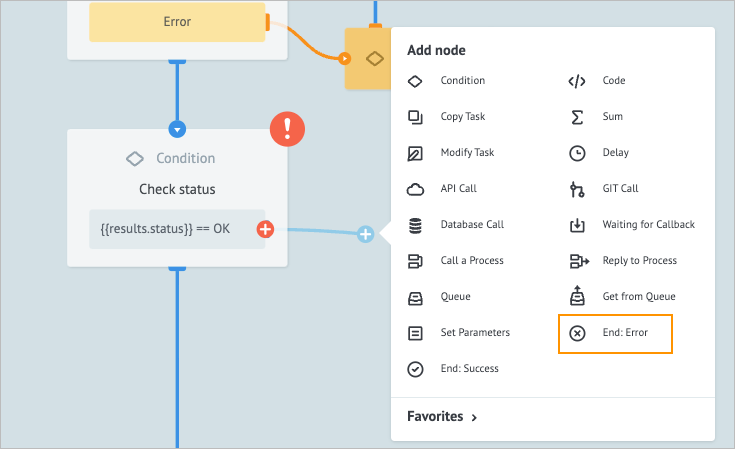
On the End: Error node details panel, enter Email sending error in the Add title field.
In the upper-left corner, click Deploy.
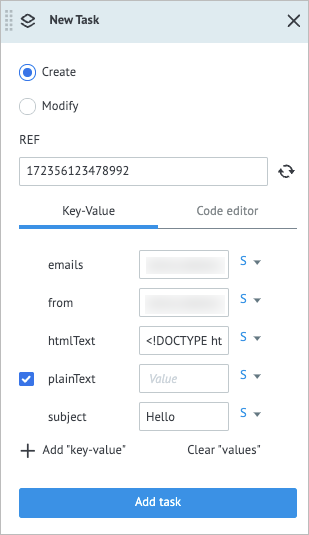
On the top panel, click View and in the upper-left corner, click + New task.

In the New Task dialog:
- Enter the recipient’s email in the emails field.
- Enter the sender's email in the from field.
- Enter the email HTML code in the htmlText field.
- Enter the email subject in the subject field.
- Click Add task.


 {height="" width=""}


Your email is sent via eSputnik API successfully, and the created request appears in the Final node.
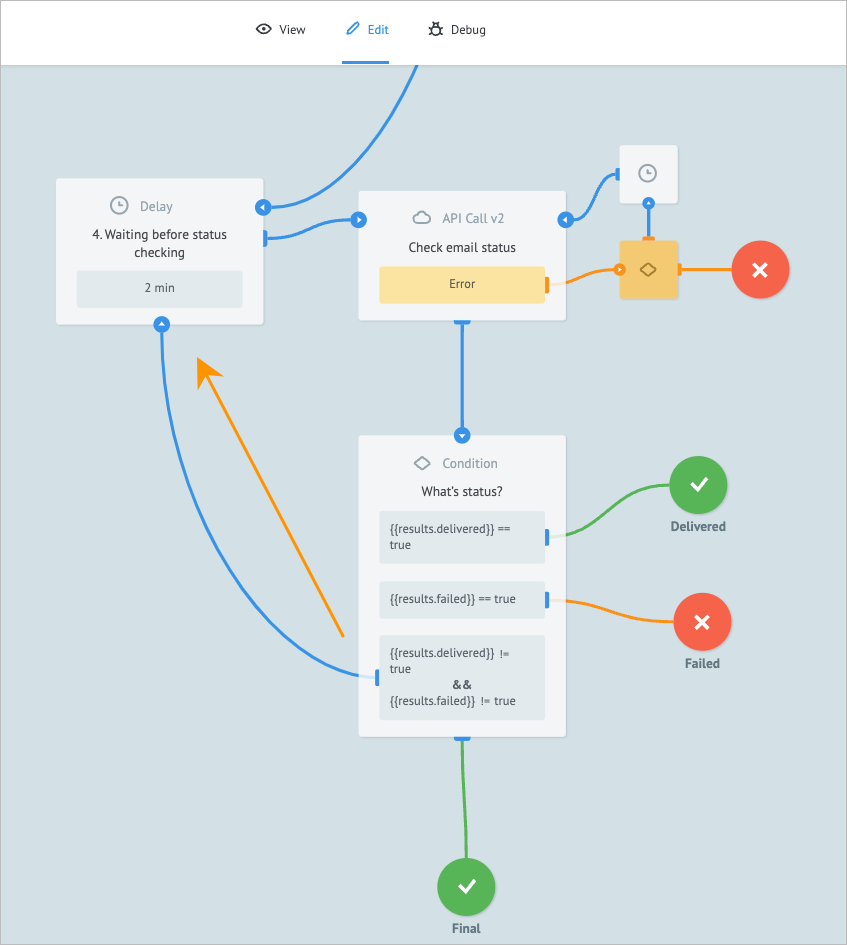
Check email delivery status
To check an email delivery status:
In the Send Email process, add the Delay node.
Note: When adding a node, hover over the needed place in the process, click the plus that appears, and select the needed node name in the dropdown list.
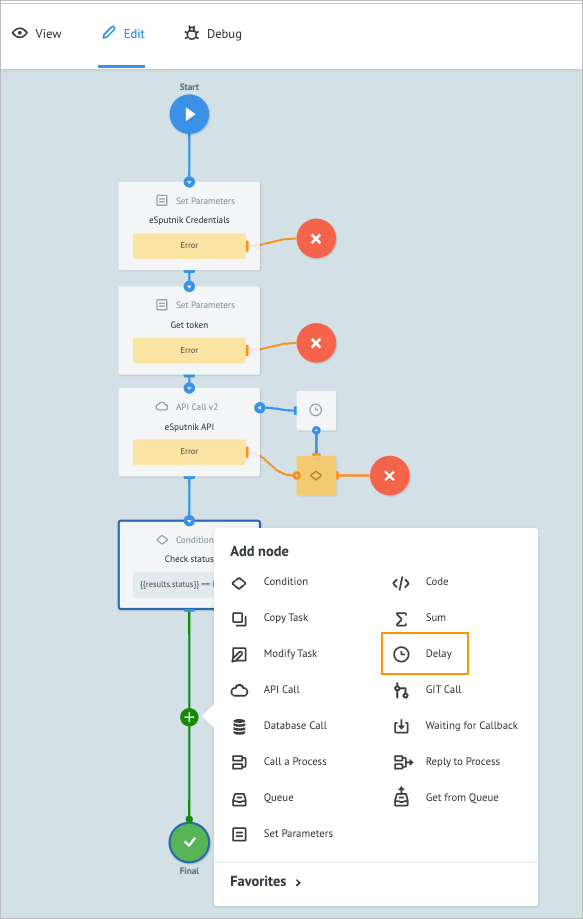
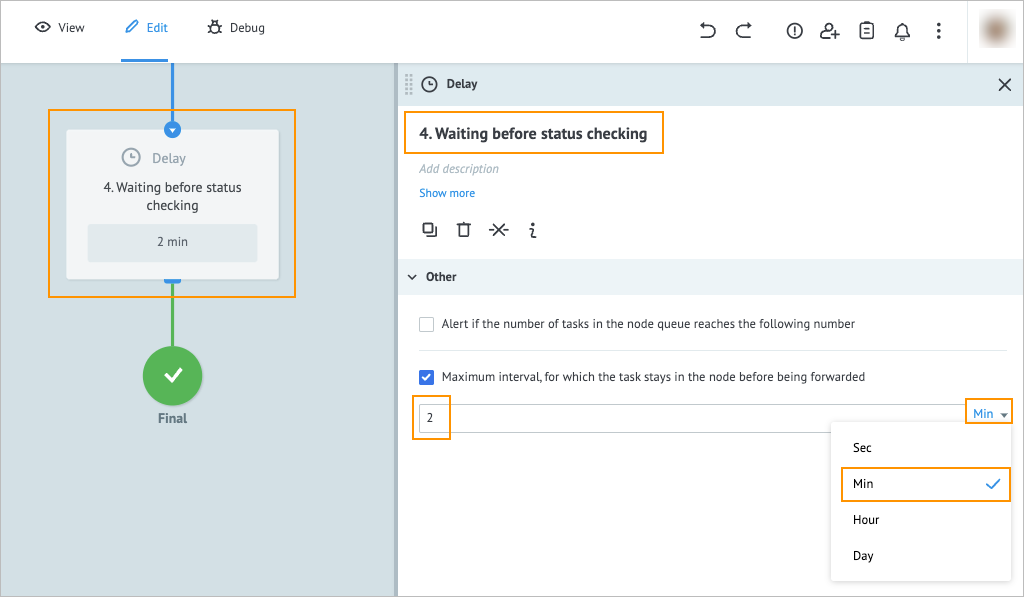
Click the Delay node and on its details panel:
- Enter 4. Waiting before status checking in the Add title field.
- Select the Maximum interval, for which the task stays in the node before being forwarded checkbox.
- Enter "2" in the field below.
- Select Min in the time interval dropdown list.
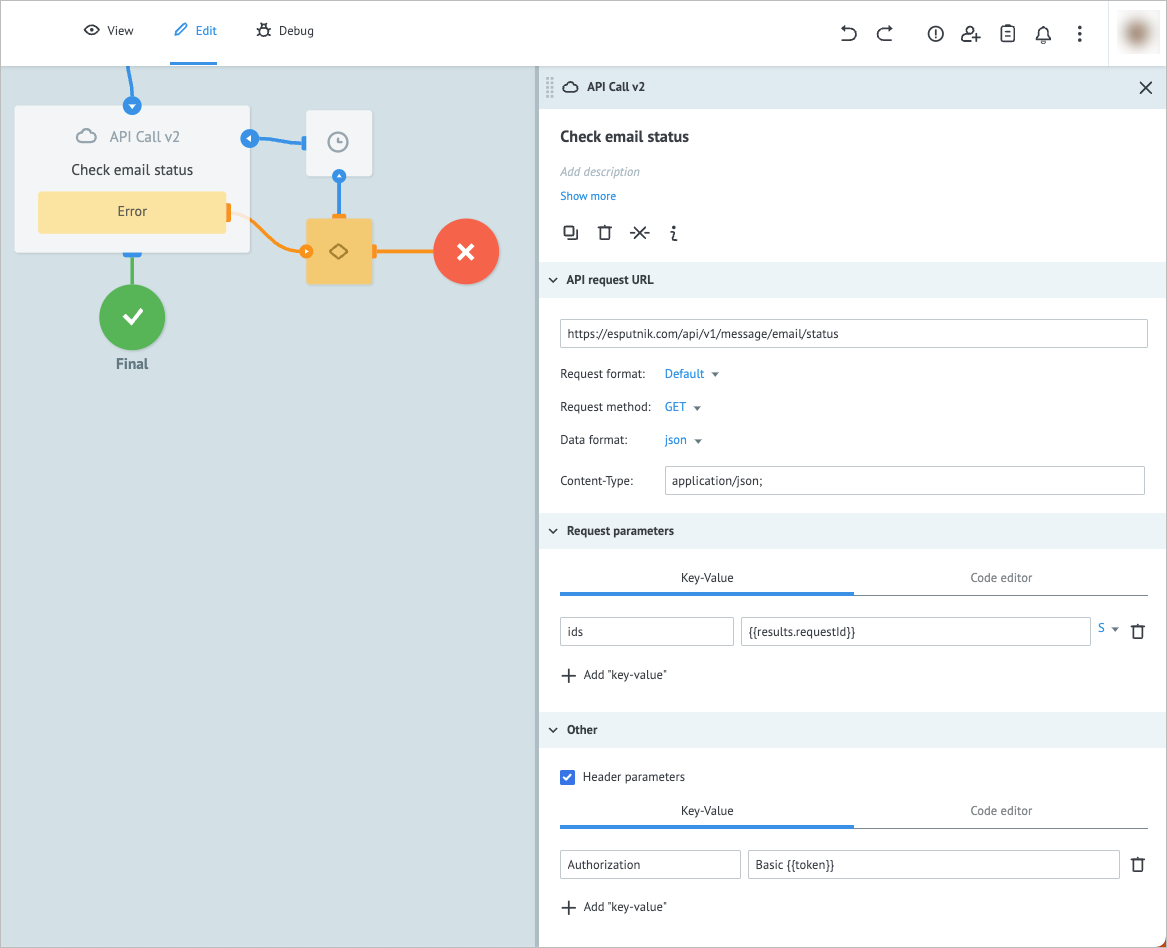
Add another API Call node to the process and on its details panel:
- Enter Check email status in the Add title field.
- Enter https://esputnik.com/api/v1/message/email/status in the URL field.
- Select Default in the Request format dropdown list.
- Select json in the Data format dropdown list.
- Enter application/json in the Content-Type field.
- Enter ids in the Key fields.
- Enter
{{results.requestId}}in the Value fields. - Select the Header parameters checkbox and enter
AuthorizationandBasic {{token}}in the corresponding Key and Value fields below.
Note: This node will call the eSputnik API to check the email delivery status.
Add another Condition node to the process and on its details panel:
- Enter What’s status? in the Add title field.
- In Condition Block, enter
{{results.delivered}}and true in the corresponding Key and Value fields. - Click + New block and enter
{{results.failed}}and true in the corresponding Key and Value fields. - Click + New block and enter
{{results.delivered}}and{{results.failed}}in the Key fields and true in both Value fields. - Select the "!=" (not equal) for both
{{results.delivered}}and{{results.failed}}values before the true in the last condition block.
Note: Thus, the tasks which check results are neither
{{results.delivered}}, nor{{results.failed}}(neither successfully delivered, nor failed to be delivered) will be forwarded for recheck.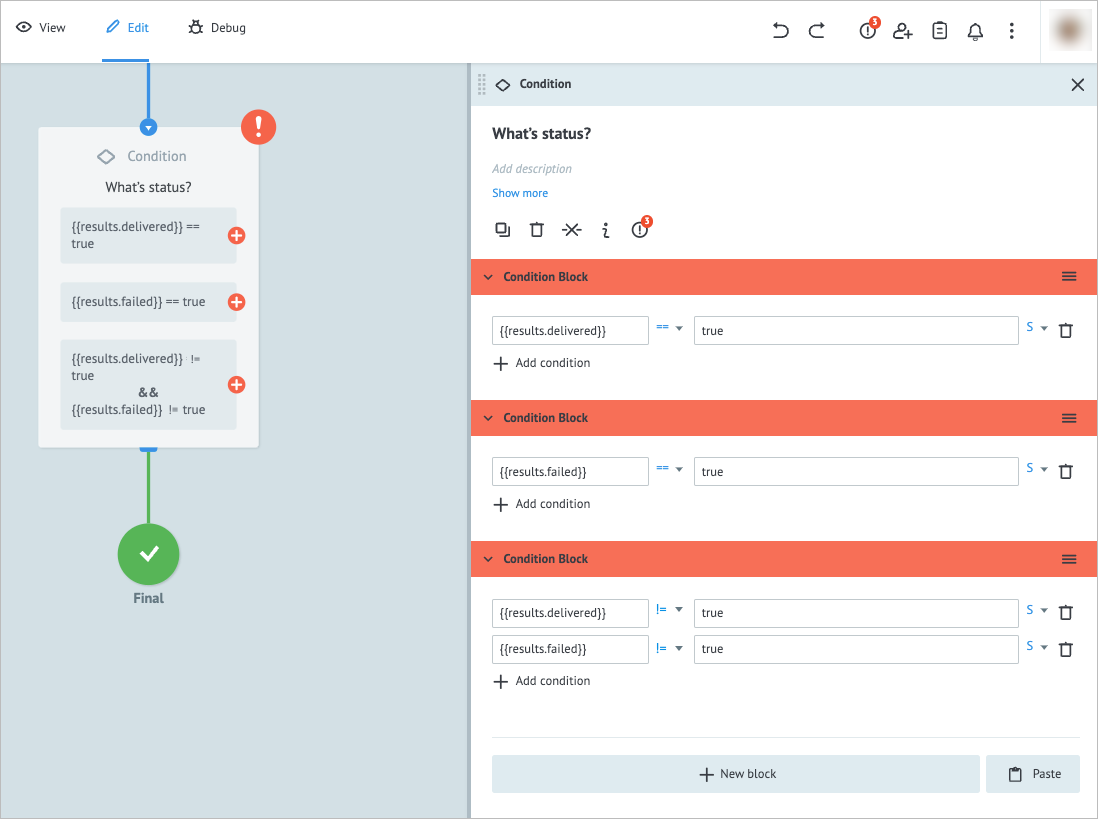
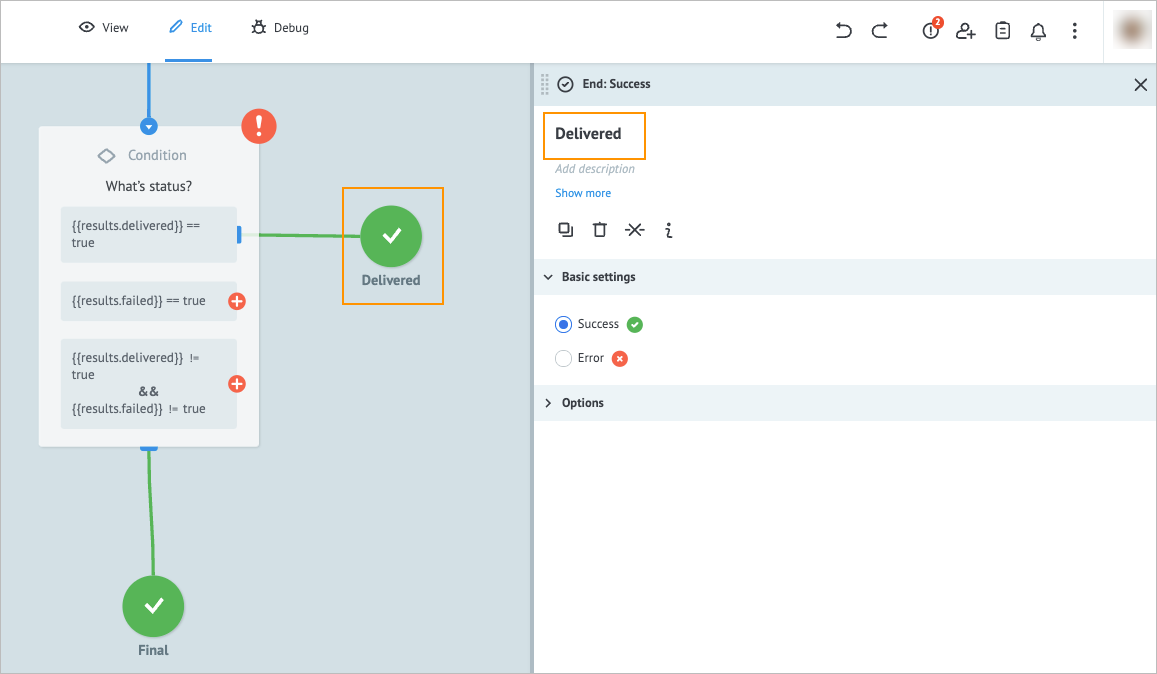
Add the End nodes to the Condition node:
On the right side of the first condition, click the plus icon, drag it to the right side of the node, and from the dropdown list, select End: Success.
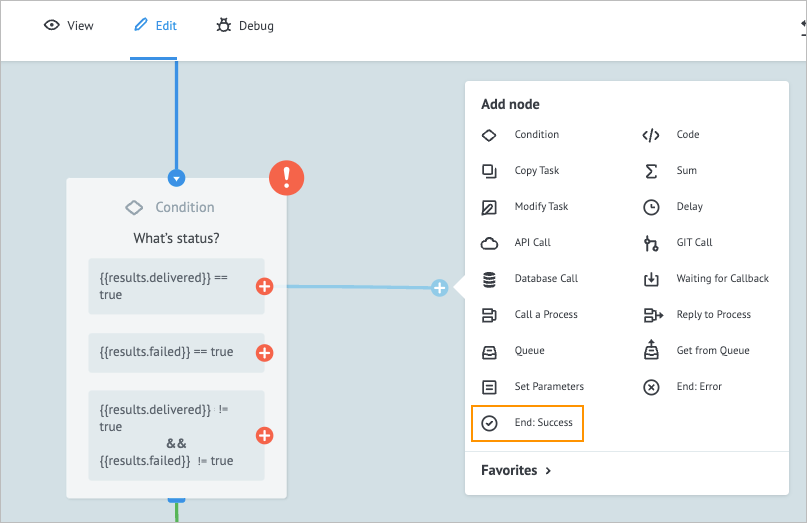
On the End: Success node details panel, enter Delivered in the Add title field.
Note: If the task satisfies the{{results.delivered}}=truecondition, it goes to the Delivered node.
On the right side of the second condition, click the plus icon, drag it to the right side of the node, and from the dropdown list, select End: Error.
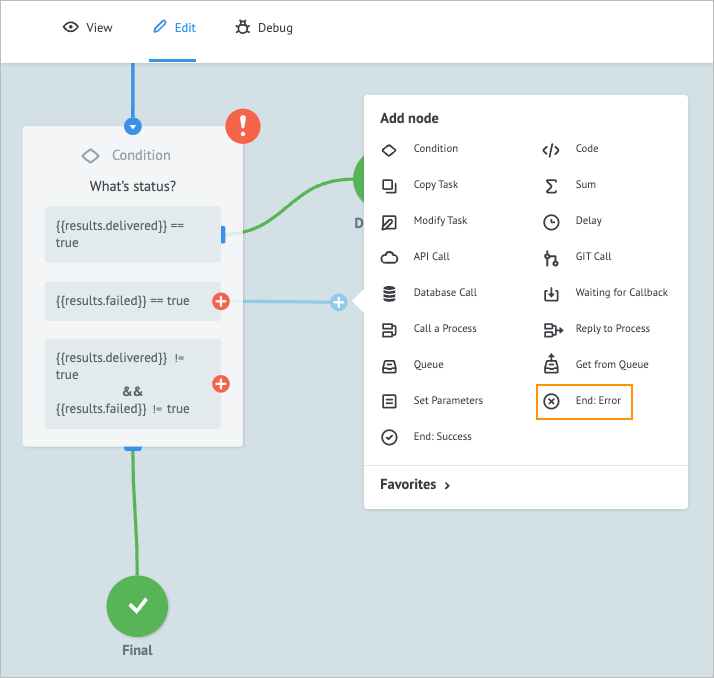
On the End: Error node details panel, enter Failed in the Add title field.

On the right side of the third condition, click the plus icon, drag it and drop it on the Waiting before status checking condition node.
In the upper-left corner, click Deploy.
On the top panel, click View and in the upper-left corner, click + New task.
In the New Task dialog:
a. Enter the sender's email in the from field.
b. Enter the email HTML code in the htmlText field.
c. Enter the email subject in the subject field.
d. Click Add task.


Your task goes to the Delivered node after two minutes. Congratulations! You have learned how to set up the Corezoid process for sending email and checking the delivery status of your emails via eSputnik API.
Was this article helpful?