API Call
- 31 Oct 2024
- 10 Minutes to read
- Contributors

- Print
- DarkLight
- PDF
API Call
- Updated on 31 Oct 2024
- 10 Minutes to read
- Contributors
- Print
- DarkLight
- PDF
Article summary
Did you find this summary helpful?
Thank you for your feedback
Overview
The API Call node is a powerful tool that enables you to make requests to any available API. The node provides a flexible and efficient way to interact with external systems and integrate them into your workflows. With the API Call node, you can easily connect and exchange data with a wide range of APIs, such as:
- Social media platforms (LinkedIn, Facebook, Twitter, Google, and so on)
- Banking services (Visa and Mastercard payments and info services)
- Web services
Before you start writing API requests, it is important to carefully read the documentation for the specific API you are going to use. This will help you understand the needed structure and authentication methods to successfully execute requests and find out important information such as API endpoints, request methods, parameter formats, and so on.
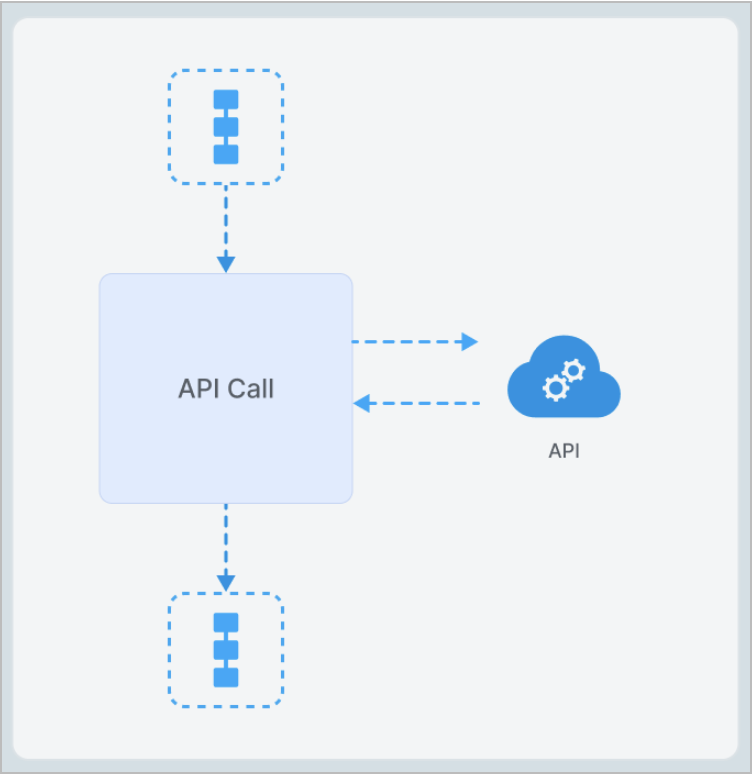
All API Requests are made from the following IP addresses:
- 54.154.124.100
- 54.154.124.224
If you encounter access errors when calling third-party APIs, you might need to white-list these addresses.
Settings
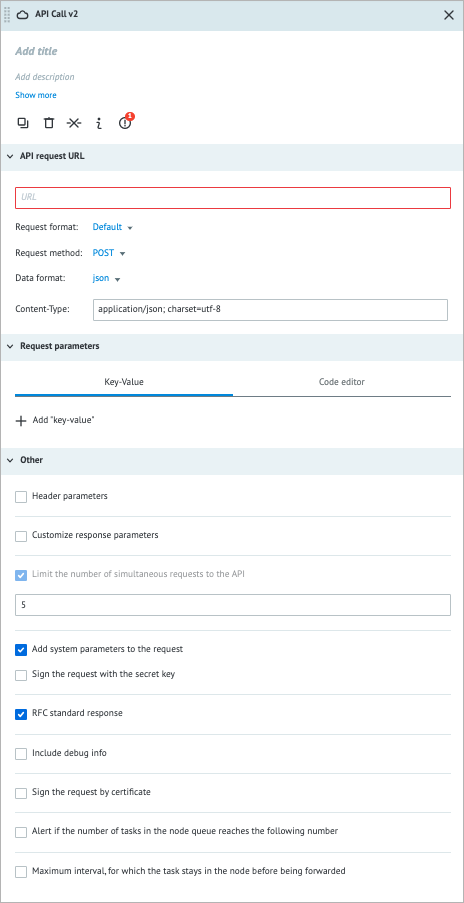
The API Call node has the following parameters:
(Optional) Title and Description: Name and details of the node.
API request URL:
URL: Indicates the URL/endpoint request.
Note: Corezoid supports the standard HTTP/HTTPS protocol and can accept any valid endpoint format, including URLs, IP addresses, and more.Request format:
- Default: A standard HTTP/HTTPS request format that adds a convenient Key-Value editor for query parameters and a request method dropdown menu.
- Corezoid: Is similar to the Default format, but it removes the ability to select a request method.
- Raw: Is a free-form request format that allows you to write custom request bodies and is used in cases when an API follows a non-standard request format.
Request method: Specifies the type of request you want to make:
- POST: Send data
- GET: Retrieve data
- PUT: Create or update existing data
- DELETE: Delete data
- HEAD: Similar to POST, but does not return a response body
- PATCH: Update only a part of the data
Note: Some APIs may have the same endpoint for different request methods.
Data format: JSON, XML, Form
Content-Type: Indicates the format of the data being sent in the request body.
Default types based on the data format:- JSON: application/json; charset=utf-8
- XML: application/xml; charset=utf-8
- Form: application/x-www-form-urlencoded; charset=utf-8
Note: The field is filled out automatically based on the data format that you have selected. You can edit it if needed.
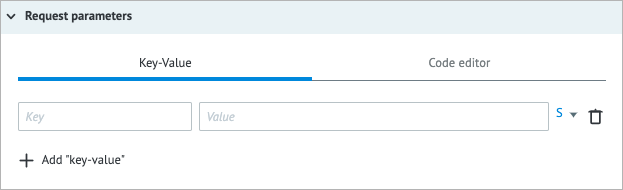
Request parameters: Request’s query parameters:
- Key: Key to specify variables; use a unique name. When updating existing variables, use their original names as a key.
- Value: The value you want to assign to the corresponding Key parameter. The value can be a constant, a variable reference, or a function applied to a variable.
Note: For more information, go to Parameters and functions.
- Type of data:
- String (S)
- Number (N)
- Boolean (B)
- Array (A)
- Object (O)
Note: For more information, go to Data types.
- Code editor: Shows the JSON format of the entered key and value. You can write and include additional code, which will be executed when a task enters the node.
- To add a key-value, click + Add “key-value” below the Key field.
- To delete the key-value line, click the trash icon on the right side of the key-value line.
Other:
Header parameters: Indicates request’s Header parameters that are used to provide additional information about the request, such as authentication parameters and various metadata. You can specify it in the same Key-Value format as Request Parameters.
Customize response parameters: Modifies the response header and body parameters and specifies the response format before the task is released from the node. The feature can be used when:
- When dealing with APIs that provide an incorrect response format or do not specify a format at all. By customizing the response parameters, you can ensure that the response is parsed correctly.
- Minimizing the amount of data to be added to a task. Sometimes an API request returns a lot of data, but only a small number of specific parameters need to be retrieved. In this case, you can use the Customize response parameters feature to extract only the needed data.
Note: To add a key and a value, see step 3 of this topic.
Limit the number of simultaneous requests to the API: Controls the maximum number of concurrent requests made to the API. By default, it is set to 5, but you can adjust it to comply with the number required by the API.
Add system parameters to the request: Adds Corezoid system parameters to the API request that are required to make a request to the Corezoid API and can be the following: conv_signature, conv_time, and conv_id. For more information, go to Corezoid API.
Some APIs have strict requirements for the parameters that can be included in a request. If this is the case for the API you are using, you may need to clear the checkbox to exclude Corezoid system parameters from your request.
Sign the request with the secret key: Makes requests to Corezoid's API, which requires all requests to be authenticated with a secret key.
Note: To include the necessary system parameters along with the request, you have to select the Add system parameters to the request option.RFC standard response: With this option selected, the response will be processed in compliance with the RFC standard.
Note: When this option is selected, the response body is mandatory for response codes 200 and 201 and is optional for the 202 response code.Include debug info: Adds extra information about the API request to a task parameter called conveyor_api_debug that includes execution time, request body size, response code, and response body size.
"__conveyor_api_debug__": {
    "http_exec_time": 328.552,
    "http_req_body_size": 0,
    "http_res_code": 200,
    "http_res_body_size": 1132
}
Sign the request by certificate: If APIs require you to include a client certificate with your request, you can add it in the PEM format by selecting this option.
-----BEGIN RSA PRIVATE KEY-----
....your private key goes here....
-----END RSA PRIVATE KEY-----
-----BEGIN CERTIFICATE-----
....your certificate goes here....
-----END CERTIFICATE-----
Alert if the number of tasks in the node queue reaches the following number: Helps monitor whether the number of tasks in the node exceeds the specified threshold. When selecting the checkbox, you have to enter the needed number of tasks in the field that appears below.
Maximum interval, for which the task stays in the node before being forwarded: The amount of time a task is allowed to be in the node; can be set in seconds, minutes, hours, and days.
Note: The checkbox has a minimum value of 30 seconds. You can set a shorter interval by using the Unixtime function.

Examples
There are innumerable ways in which companies choose to implement their APIs:
- Using different data formats, including JSON and XML as the most popular ones
- Applying certificates
- Getting an API key or token
- Generating an authentication code and periodically renewing their access token
There are no commonly used examples that can cover all the possible features.
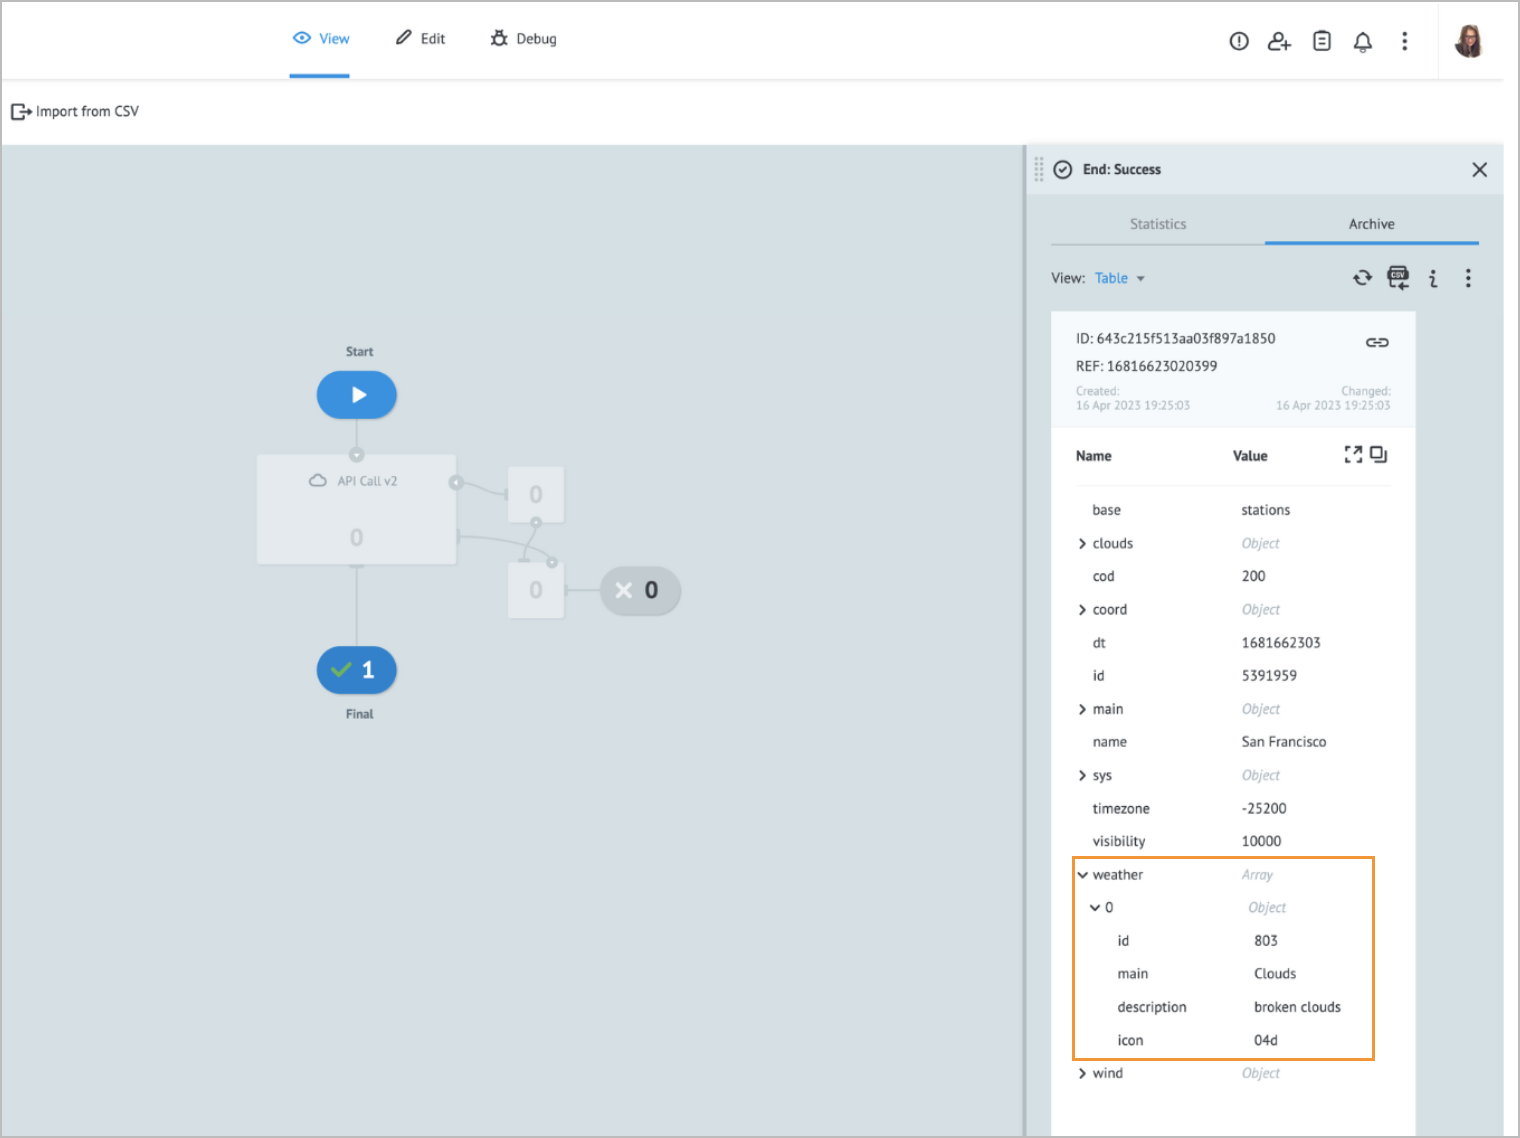
API call to OpenWeatherMap
OpenWeatherMap is a popular free API that you can use to check the weather at any location.
To check the weather in San Francisco:
Create a Process and add the API Call node.
Note: For more information, go to Create Process and Add node.Go to OpenWeatherMap and get the needed API where:
- https://api.openweathermap.org/data/2.5/weather is the endpoint URL.
- lat, lon, and appid are parameters.
The appid parameter is a unique API key that you get by creating an account with the service.
https://api.openweathermap.org/data/2.5/weather?lat={lat}&lon={lon}&appid={API key}In API request URL of the API Call node details panel:
- In the URL field, enter the endpoint URL.
- In the Request method dropdown list, select GET.
In Request parameters of the API Call node details panel, enter the lat, lon, and appid parameter values.

- Switch to the View mode by clicking View on the upper panel.
- In the New Task dialog that opens, click Add task.
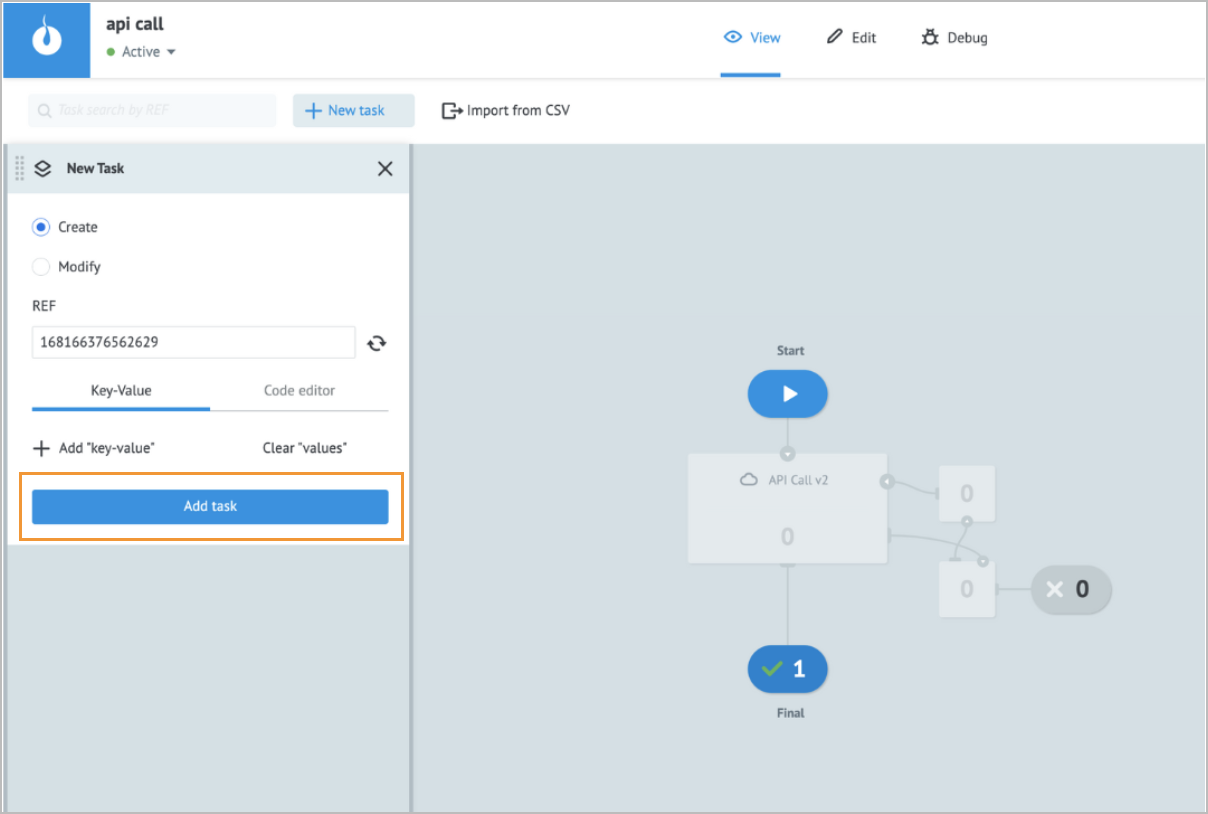

On the task details form, you can see that it’s cloudy in San Francisco now.
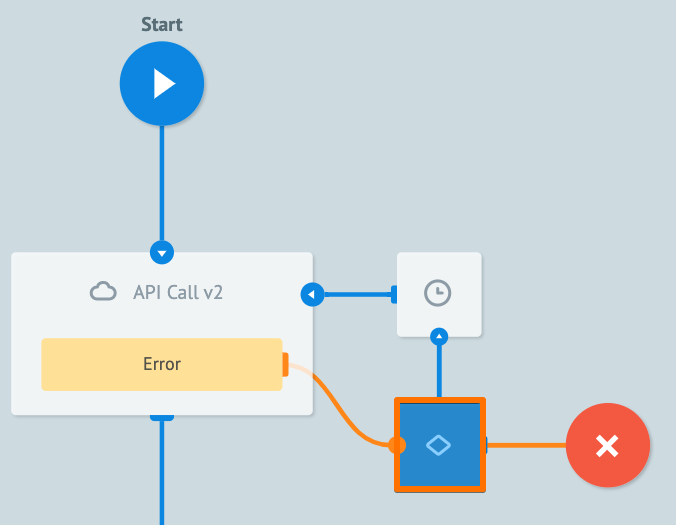
Error handling & troubleshooting
When an error occurs in the API Call node, a task goes to the auxiliary Condition output node that is used for storing error parameters.
When an error occurs during the task processing, you may see the following error parameter names in the task.
| Error parameter name | Error type |
|---|---|
__conveyor_api_return_type_error__ | Hardware (system error), Software (error in a node logic/settings). |
__conveyor_api_return_type_tag__ | Error tag. |
__conveyor_api_return_type_description__ | Error description in human-readable language; can be static or dynamic. |
*The error tag __conveyor_api_return_type_tag_ may have the following values.
| Value | Cause | Solution |
|---|---|---|
| access_denied | You don't have access to the Process you are trying to call. | Contact the Process owner to get access. |
| access_denied | You are trying to send or receive tasks from another stage. | It's not allowed to get and send tasks between stages. Use the same stage to send and receive tasks. |
| access_refused | The Process you are working in is not a State Diagram but it must be a State Diagram. | Check the logic of using a State Diagram. For more information, go to State Diagram. |
| api_expire_query | Your API query has expired: a) The API has taken too long to respond. b)The number you specified in the Limit the number of simultaneous requests to the API field has been exceeded. | Check possible solutions with the API provider. |
| api_bind_error | The request parameters you defined in the Key and Value fields could not be added to the URL to form a request. | Make sure the parameters are formatted correctly. |
| api_bad_answer: timeout or failed_connect | The API Call node did not receive a response from API or failed to establish a connection with it after 60 seconds. | Check possible solutions with the API provider. Make sure the URL you provided is correct. Corezoid will reattempt to send a request every 30 seconds. |
| api_conv_not_active | The process associated with an API Call node is either inactive or in a debug state. | Ensure the process is active and not blocked before initiating the API Call node. |
| api_no_valid_json | The request header or body is formatted incorrectly. | Correct the request header or body format. |
| api_no_ops | The API response does not contain an ops block or contains an incorrect ops block. | For more information about the ops blocks, go to Corezoid API. |
| wrong_validate_params value when using the Customize response parameters option | The variable that the API Call node is trying to access has not been sent to the API or has a different type than the specified one. | Make sure the parameters you are trying to modify exist, or change the parameter type. |
| api_bad_answer: no_scheme | The URL field is empty. | The URL field can be empty when it refers to a variable with no value. Make sure to provide a valid URL. |
| api_no_request_proc | Incorrect tag “request_proc” is set. | Ensure that you specify "request_proc=ok" for your response. If you want to send an error, use "proc!=ok". |
| api_wrong_convert_param | Parameter value failed to convert with the specified parameter type. | Check and correct the data type of the parameter specified in the error message. |
| api_bad_res_data | The data format you are trying to send to the API is incorrect. | For more information about the correct format, go to Corezoid API. |
| not_found_conv_by_alias | Your alias is linked to the Process that no longer exists. | Use an existing Process. |
| api_task_size_overflow_limit | The size of the task data exceeds the specified limit set for your environment. | Reduce the size of your task. |
| api_size_overflow_limit | The size of the task data exceeds the specified limit set for your environment. | Reduce the size of your task. |
| api_bad_certificate | The API you are trying to connect to requires a certificate. Your certificate is missing or invalid. | Contact the API developer to get the certificate. |
| env_var_not_found | The variable or alias you are trying to connect doesn't exist. | Check the variable or alias or use another one that is in your list. |
| bad_callback_node | The Process you are calling doesn't have the Callback node. | Create the Callback node in the Process you are calling. |
| api_no_valid_xml | The API you are trying to call does not correspond to the format selected in the API Call node. | Contact the API developer for further assistance. |
| api_no_valid_nvp | The API you are trying to call does not correspond to the format selected in the API Call node. | Contact the API developer for further assistance. |
| api_max_http_resp_size_exceed | There is a large response from the external API that exceeds the limit of the task. | Contact your administrator to increase the task's allowed size. |
| api_bad_url_error | The URL is invalid or doesn't exist. | Check whether the URL is correct. |
| bad_url_by_rfc | The URL is invalid or doesn't exist. | Check whether the URL is correct. |
| api_blocked_url | You can't call an API in this domain because it is blocked by Corezoid. | Contact your administrator for further assistance. |
| api_bad_header_error | The external API replies with an invalid header as it contains ASCII characters. | Check your external API header or contact API developers for further assistance. |
| api_fatal_error | There was an internal Process error while executing the API request. | Contact the support team for further assistance. |
Was this article helpful?